CleanShot X Review (Mac) — Five Tasks Tested, Long Pages to the End, and a Permission for Three Features on macOS 27
Published November 15, 2026 (updated November 16, 2026)
Steps checked November 15, 2026 (MacBook Air (M2), macOS Golden Gate 27.2.1)
By Wada Digital Lab
CleanShot X is a Mac screenshot app that captures long pages in one image, adds arrows and blur, records the screen and reads text from images, all from one menu bar icon. We tried it through Setapp on our recording Mac. Scrolling by hand, it captured a long page all the way to the end in one image, and Capture Text read every word of a diagram. On macOS 27.2, three features (Auto-Scroll, Show Keystrokes and Studio Mode) asked for the Device Control and Data Access permission. When we turned it on, all three worked. This review covers what we found on November 14 and 15, 2026.
Key points
- Capturing a long page took 6 steps. Scrolling by hand, CleanShot X captured the page all the way to the end. In the same task, the built-in macOS tools gave us a PNG of only the first page, and Shottr stopped partway at its height limit.
- Capture Text (OCR) read every word of a diagram on our blog, and we pasted the text into Notes. Some words from the left and right columns of the diagram ended up on the wrong lines.
- On macOS 27.2, Auto-Scroll, Show Keystrokes and Studio Mode (automatic zooms) asked for the Device Control and Data Access permission. On November 15, with the permission on (macOS 27.2.1), Auto-Scroll reached the bottom of a long page in about 34 seconds, and Show Keystrokes and Studio Mode worked too. It is a powerful permission, so we turned it off afterward.
- To use Shift-Command-4 for CleanShot X, we first had to turn off the macOS screenshot shortcuts in System Settings. CleanShot X itself has no switch that replaces them.
- There are three ways to get it: pay once for CleanShot Basic (with one year of updates), keep paying for CleanShot Pro, or use it through Setapp, a service that gives you many Mac apps for a monthly fee. CleanShot X has no trial of its own. Setapp has 7 free days.
The diagram below sums up four things we found.
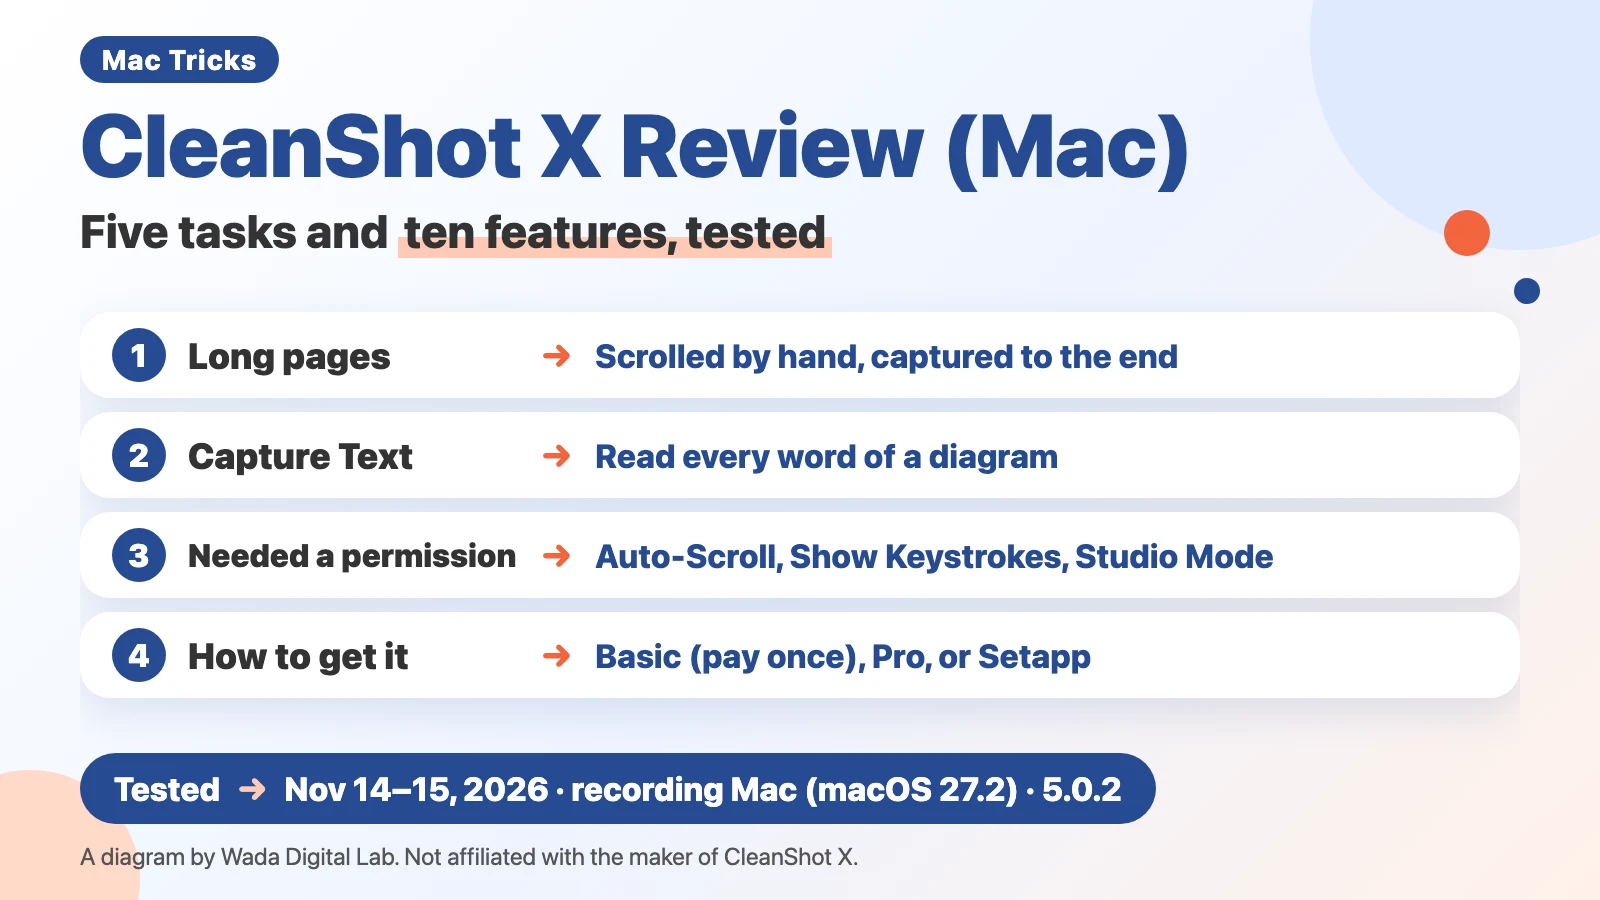
Who CleanShot X is for
CleanShot X is an app you use instead of the built-in macOS screenshot tools. From one menu bar icon, it captures, annotates, records, reads text and pins images to the screen. It is Mac only. The official FAQ says: “There's no Windows version.”
| Good fit | Not a good fit |
|---|---|
| You make guides and need whole long pages in one image | Capturing what is on screen is all you need (macOS already does that) |
| You add numbers, arrows and blur, then paste right away | You would rather not add security permissions (three features need one) |
| You want screen recordings and GIFs in the same app | You want to try the app on its own before paying (there is no trial) |
At Wada Digital Lab, we once bought CleanShot X to make step-by-step guides, but we never learned to use it well. This time, we went through its features one by one.
How we tested
- Mac and versions: our recording MacBook Air (M2) with macOS 27.2 in English. CleanShot X 5.0.2 came from Setapp (the About window says “5.0.2 - Setapp”). We ran five tasks on November 14 and ten features on November 15, 2026.
- Pages: articles on our blog and a sample contact list with fictional names and example.com email addresses. No real person’s information was captured.
- What we counted: the number of steps. Each key press, click, drag and typed entry counts as one. Just moving the pointer, and scrolling the page, do not count. The Mac was operated by an AI, not a person, so we did not compare times. These counts come from the English screen. Our Japanese article counted on the Japanese screen separately, and a few tasks differ by one or two steps.
- Permissions and accounts: for the five tasks and the ten features, we did not add security permissions beyond the ones already on the Mac, such as screen recording. On the evening of November 15, we turned on Device Control and Data Access, tried the three features that need it, and turned it off again. We did not create a CleanShot Cloud account.
- What this test cannot tell you: we did not upload anything to CleanShot Cloud. Each task was tried once.
We ran the same five tasks with the built-in macOS tools, Shottr and Xnapper. The step counts are under “How it compares” below. A table of how you pay and what six apps can do is in Screenshot Apps for Mac Compared.
What it does: capture, annotate, record and read text
The CleanShot X menu bar icon lists All-In-One, Capture Area, Capture Fullscreen, Capture Window, Scrolling Capture, Self-Timer, Capture Text (OCR), Record Screen, Hide Desktop Icons, Pin to the Screen... and Capture History..., among others. After you capture an area once, Capture Previous Area is added.
- After a capture: a small preview appears at the lower left with Copy and Save, a pencil to annotate, a pin to float the image, and a cloud to upload to CleanShot Cloud.
- Annotate: arrows, text, shapes, Redact, Draw, Add background (B), and tools for guides: Counter (C) adds numbers that count up 1, 2, 3; Spotlight (H) keeps one area bright and dims the rest; Highlighter (M) colors text like a marker pen.
- Record: Record Screen makes a video or a GIF. After you select the area to record, a toolbar lets you turn on system audio, the camera, Highlight Clicks and Show Keystrokes. After recording, the video editor can add zooms.
- Read text, pin, look back: Capture Text (OCR) reads text in an image. Pin floats a capture above every window. Capture History... shows what you captured before.
The diagram below splits the features we used without a permission from the ones that needed one. Here, “without a permission” means we added nothing beyond the permissions the recording Mac already had, such as screen recording. Without a permission, we captured a long page by scrolling by hand to the end (long pages, scrolled by hand to the end), and we recorded a GIF with our clicks shown (GIF recording, with clicks shown). Auto-Scroll, Show Keystrokes and Studio Mode needed a permission, set in Device Control and Data Access. With the permission, these three can be used: we tried them on November 15 (details in the section below).
Without a permission
Long pages scrolled by hand to the end
GIF recording
with clicks shown
With the permission
Needed a permission
Auto-Scroll Show Keystrokes and Studio Mode
Set in
Device Control and Data Access
Test results: long pages to the end, and the steps for five tasks
We ran the same five tasks as in our comparison. The numbers are the steps it took to finish each task.
| Task | Steps | Result |
|---|---|---|
| Capture a long page as one image | 6 | Scrolled by hand, captured to the end |
| Blur names and email addresses | 10 | Pixelate, used twice, made them unreadable. Nothing found them automatically |
| Add an arrow and text | 11 | Done |
| Record the screen with Mac audio | 7 | A video with sound (Record System Audio turned on) |
| Capture and paste into Notes | 7 | Done |
Scrolling by hand, the long page came out as one image, all the way to the end. Choose Scrolling Capture, select the area, click Start Capture, scroll the page down yourself, then click Done. The result was 2380 × 26780 pixels and could be read from top to bottom. In our Japanese-language test, scrolling fast brought up “Please slow down...”, so scroll slowly.
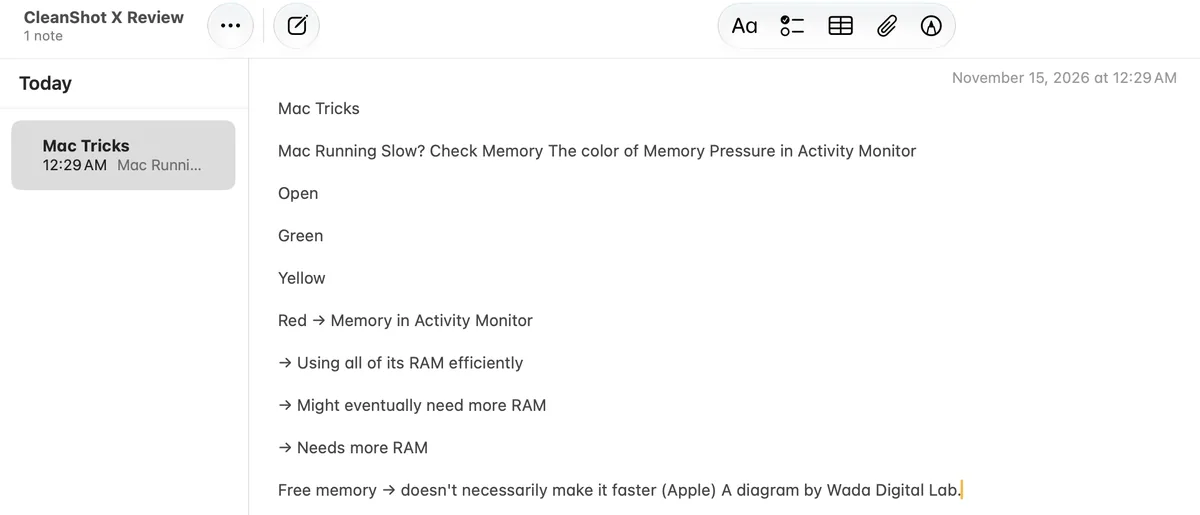
Capture Text read every word of a diagram. We chose Capture Text (OCR), selected a diagram on our blog (an image, so its text cannot be selected), and the text went to the clipboard as soon as we let go. We pasted it into Notes. Every word was there, but some pairs from the left and right columns ended up on different lines: “Red → Memory in Activity Monitor” came out on one line, while the diagram has “Open” next to “Memory in Activity Monitor”. In our Japanese-language test, it also read Japanese text in the same way.
The photo below shows the text pasted into Notes.
We also tried these features one at a time.
- Pin: the pin on the preview floated the capture above every window. It stayed on top while we typed in Notes (9 steps).
- Add background (B): we picked one of the Gradients and raised Padding, Shadow and Corners, then saved it (11 steps).
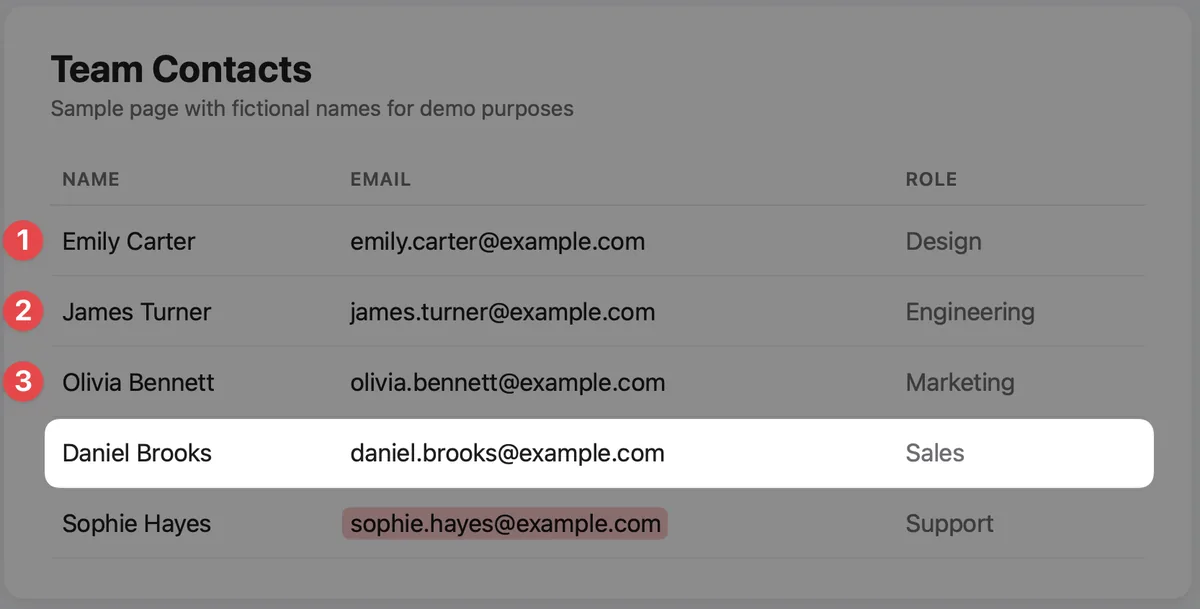
- Counter, Spotlight and Highlighter: on the sample contact list, we added numbers 1 to 3, made one row stand out and marked one email address (14 steps). See the photo below.
- GIF with Highlight Clicks: we recorded a 15.8-second GIF with clicks shown. It took about 4 seconds to create after we stopped.
- Zoom in the video editor: we added a 150% zoom by hand and exported. At the original size, exporting a 12-second recording took about 3 minutes. The Resolution menu offers smaller sizes.
- Capture History: past captures lined up across the top of the screen, with All, Screenshots, Videos, GIFs and Video Projects filters. No account was needed.
- All-In-One: Area, Fullscreen, Window, Scrolling, Timer, OCR and Recording sit in one bar, so one shortcut can start any kind of capture.
- CleanShot Cloud: clicking the cloud showed “You need to log in first.” You need an account to upload and share links.
On macOS 27, three features need the Device Control and Data Access permission, and all three worked once it was on
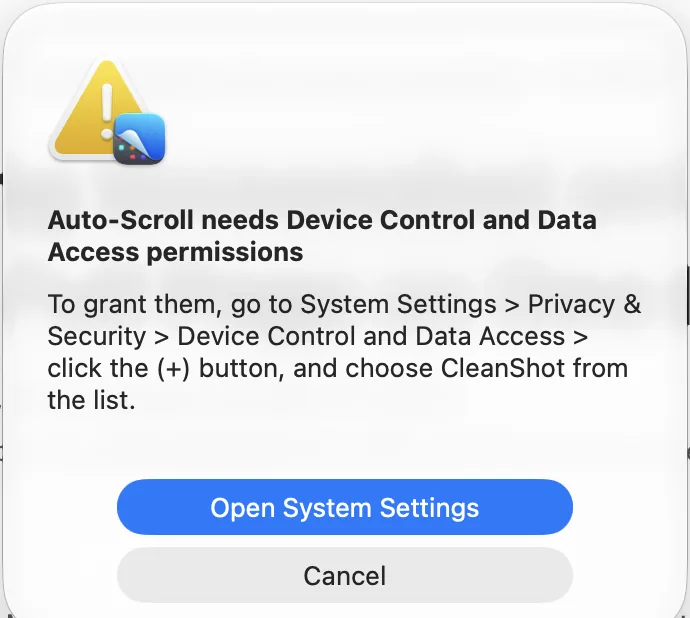
On macOS 27.2, clicking Auto-Scroll, Show Keystrokes or Record in Studio Mode brought up a CleanShot X window asking for a permission. All three ask for the same one: System Settings > Privacy & Security > Device Control and Data Access.
The photo below is the window that appeared when we clicked Auto-Scroll during a Scrolling Capture.
In the text files inside macOS 27.2.1, the name Device Control and Data Access sits under a key called ACCESSIBILITY. It looks like the Accessibility permission from earlier versions of macOS under a new name, but we have not compared the two screens side by side.
This is a powerful permission. System Settings shows this description above the list:
Apps with this access can view and send email, edit contacts and photos, monitor your keyboard, track websites, record your screen, control any app on your Mac, and more.
Read it and decide for yourself whether to turn it on. On November 15, we turned it on for CleanShot X on our recording Mac (macOS 27.2.1, English), tried the three features, and turned it off again. Here is how to turn it on:
- Open System Settings from the Apple menu and choose Privacy & Security in the sidebar.
- Scroll down and click Device Control and Data Access.
- Turn on the switch next to CleanShot X. (It was already in the list on our Mac. If it is not there, CleanShot X’s own message says to add it with the (+) button.)
- When the window says “Privacy & Security is trying to modify your system settings.”, use Touch ID or enter your password.
To turn it off, go back to the same place and turn off the switch next to CleanShot X. When we turned it off, Touch ID was not requested.
The photo below shows step 3 with the switch on. We cropped out the other apps in the list.
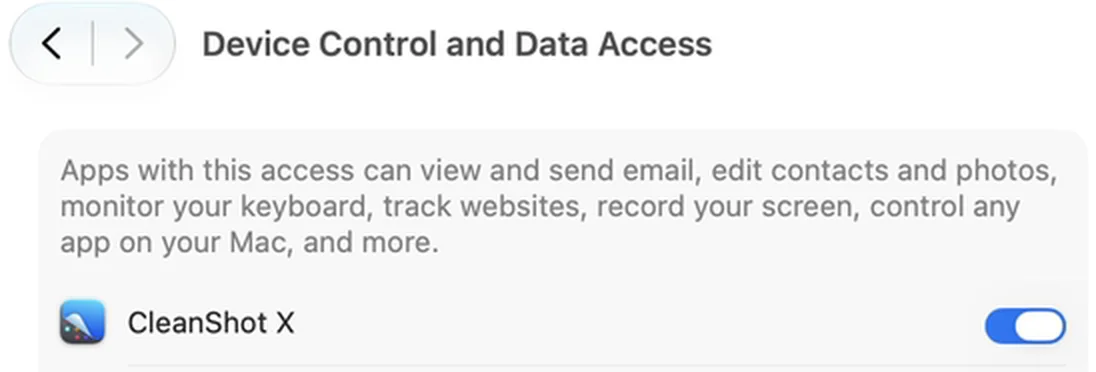
With the permission on, none of the three features asked for it again.
- Auto-Scroll: in Scrolling Capture, we selected the area, clicked Start Capture, then Auto-Scroll. The page scrolled by itself and reached the end in about 34 seconds, making one seamless image of 1340 × 31924 pixels. At the end, CleanShot X showed “Screenshot is very large”.
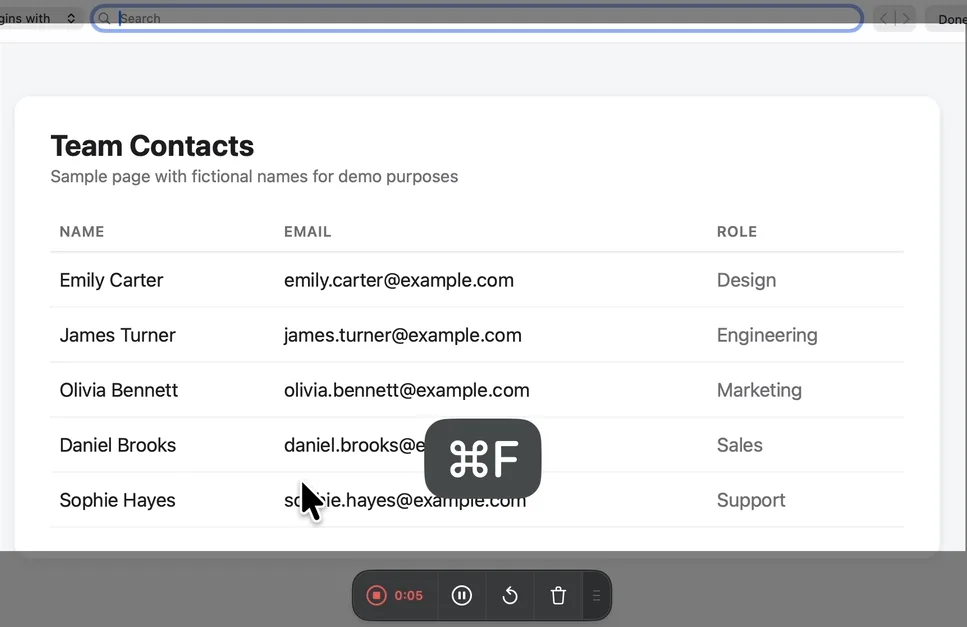
- Show Keystrokes: after selecting the area in Record Screen, we turned on the keystroke button (the Command key symbol) in the toolbar, then recorded. Command-F, Return, Esc, Command-= and Command-minus each appeared on screen as we pressed them.
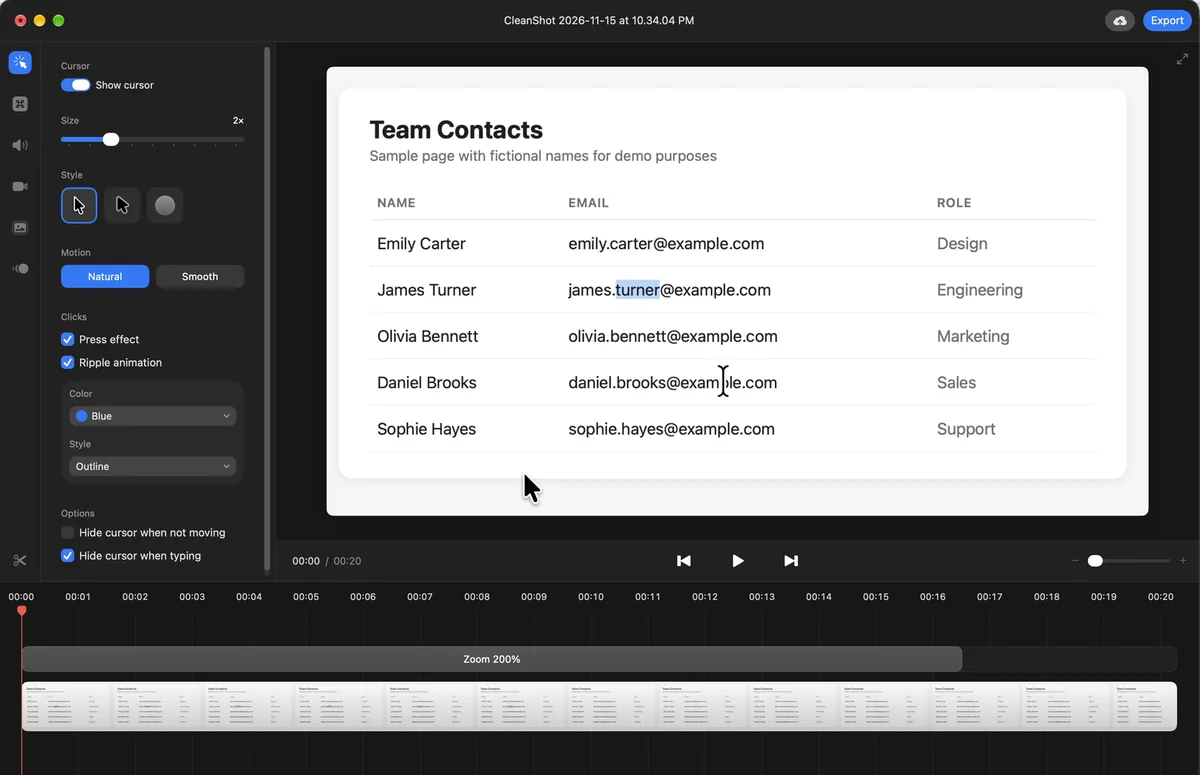
- Record in Studio Mode: when we stopped recording, the Studio editor opened with a “Zoom 200%” already added, following our clicks. Exporting the 20-second recording at its original size (1720 × 940, Quality High) took about 1 minute.
The photo below was taken while recording with Show Keystrokes on. We pressed Command-F in Safari, and the keys appeared in the middle of the screen.
The photo below is the Studio editor right after a Studio Mode recording. The “Zoom 200%” on the timeline was added automatically.
Using Shift-Command-4 for CleanShot X
CleanShot X has no switch that replaces the macOS screenshot shortcuts. In our test on a Japanese-language Mac, CleanShot X would not take Shift-Command-4 while the macOS shortcut was still on. We first went to System Settings > Keyboard, clicked Keyboard Shortcuts..., chose Screenshots, and turned off the shortcuts for saving the screen and a selected area as a file and for the screenshot and recording options. Then, in CleanShot X Settings... > Shortcuts, we set Capture Area to Shift-Command-4, Capture Fullscreen to Shift-Command-3 and All-In-One to Shift-Command-5. It took 16 steps. Because that test used the Japanese screen, we do not quote the English names of the macOS items here. To go back to the macOS shortcuts, turn those Screenshots shortcuts back on and remove the shortcuts you set in CleanShot X Shortcuts.
What we liked and what to watch for
What we liked
- Long pages to the end: of the four we tried (the built-in macOS tools, Shottr, Xnapper and CleanShot X), CleanShot X was the only one that captured the long page to the end (we did not raise Shottr’s height limit and try again).
- Capture Text: it read every word of a diagram. Check the line order after you paste.
- Everything after the capture is in one place: copy, save, annotate and pin from the small preview, and get older captures back from Capture History.
- Tools for guides: Counter, Spotlight and Highlighter are there when you make step-by-step images.
What to watch for
- Three features need a powerful permission: Auto-Scroll, Show Keystrokes and Studio Mode did not work without Device Control and Data Access. Apps with this access can monitor your keyboard and control any app on your Mac.
- No automatic blur: you select what to blur yourself. Xnapper hid email addresses automatically.
- The menu shifts: each time you capture an area, Capture Previous Area is added and the items below move down by one.
- Large exports are slow: a 12-second recording took about 3 minutes to export at its original size.
Pricing and how to try it: CleanShot Basic, CleanShot Pro or Setapp
We checked the official CleanShot X and Setapp pages on November 15, 2026.
- CleanShot Basic: pay once. It includes one year of updates. After that, you can pay a yearly renewal if you want new versions. The pricing page says “Pay once, use forever.” It comes with 1 GB of CleanShot Cloud storage.
- CleanShot Pro: paid per user, every month or once a year. It is always up to date and comes with unlimited CleanShot Cloud storage.
- Setapp: a service that gives you many Mac apps for one monthly fee. The CleanShot X page in the Setapp app says “With Setapp, you get the CleanShot X+ Cloud Pro version”. Setapp has 7 free days.
CleanShot X has no trial of its own. The official FAQ says “We don't provide a trial” and offers a 30-day money-back guarantee instead. There is also a student discount for a university-issued email address. It needs macOS 13.0 or newer, and the FAQ adds that some OCR languages may require the latest macOS version. Prices change with exchange rates and sales, so we do not list them here. See the CleanShot X pricing page and the Setapp pricing page.
We used Setapp’s free days for this test. On November 14, the Setapp app on our English-screen user account showed “6 days left in trial”. On November 15, it showed no price and no days left. If you do not want to keep it, cancel Setapp before the free days end.
How it compares
We ran the same five tasks with the built-in macOS tools, Shottr and Xnapper (free version), all on macOS 27.2 in English. Here is how they differed from CleanShot X.
- Built-in macOS tools: for the long page, we used Export as PDF in Safari and then exported a PNG from Preview, but the PNG had only the first page (12 steps). There is no blur, so we covered names with black boxes. Screen recording with Mac audio took 6 steps. For capturing what is on screen, macOS is enough.
- Shottr: Auto-scrolled the long page in 4 steps, but stopped partway with “Max height reached”. We did not raise its height limit and try again. Blur took 8 steps and the arrow and text took 9. It has no screen recording.
- Xnapper: Redact sensitive data hid the email addresses automatically. It has no long-page capture and no screen recording. The free version adds a background and a watermark to saved images.
- KoeShot (an app we make and sell): a multi-function screenshot app you run with your voice. You press Option-S, then say things like “capture an area” or “scroll this page and capture it” instead of pressing key combinations. Long-page capture works in Safari and Chrome-based browsers and needs a one-time browser setting first. It works on a Mac with a chip made by Apple (such as M1 or M4) and macOS 26 Tahoe or a newer macOS. It does not work on Intel-based Macs or on macOS 15 Sequoia or older. Before you buy, the app works on its own for 14 days after you install it, with no license key. We have not yet run these five tasks with it. KoeShot for Mac
For a side-by-side table of six screenshot apps, see Screenshot Apps for Mac Compared. To capture a long page with what is already on your Mac, see Scrolling Screenshot on Mac.
FAQ
Is CleanShot X a one-time purchase?
CleanShot Basic is. It includes one year of updates, and after that you can pay a yearly renewal. CleanShot Pro is paid every month or every year, and Setapp is paid every month. Check the official pricing page for the amounts.
Is there a CleanShot X trial?
Not on its own. The official site offers a 30-day money-back guarantee. Setapp has 7 free days, and CleanShot X is included.
Can CleanShot X scroll a long page automatically?
Yes, but Auto-Scroll asked for the Device Control and Data Access permission on macOS 27.2. With the permission on (macOS 27.2.1), it reached the end of a long page in about 34 seconds and made one image. Without it, we scrolled by hand and still got the whole page in one image.
Does CleanShot X work on Windows?
No. The official FAQ says there is no Windows version and no plan for one at the moment.
Test environment and sources
On November 14, 2026, we ran the five tasks on our recording Mac (MacBook Air M2, macOS 27.2, English) with CleanShot X 5.0.2 from Setapp. On November 15, we tried ten features on the same Mac (macOS Golden Gate 27.2). The built-in macOS tools, Shottr 1.10.0 and Xnapper 1.18.1 (free version) were tested on the same Mac on November 14. The Shift-Command-4 steps and the “Please slow down...” message come from our test on the same Mac with the Japanese screen (macOS 27.2.1) on November 15.
The ACCESSIBILITY key comes from the text files of the Privacy & Security settings in macOS 27.2.1 on a MacBook Air (M4), checked on November 15, 2026. On the evening of November 15, we turned on the permission on the recording Mac (MacBook Air (M2), macOS Golden Gate 27.2.1, English), tried the three features that need it, and turned it off again.
Pricing, how you pay, system requirements and whether there is a trial come from these official pages, read on November 15, 2026. They may change.
We are not affiliated with the other companies in this article. We used CleanShot X during Setapp’s free days and received nothing from the maker of CleanShot X or from Setapp.
November 16, 2026: added our test of Auto-Scroll, Show Keystrokes and Studio Mode with the Device Control and Data Access permission turned on (November 15, macOS 27.2.1), with three photos.