How to Scan Documents on iPhone — Notes, Files, Preview, and Straight to Your Mac
Published November 2, 2026
Official documentation reviewed November 2, 2026 (some steps not tested)
By Wada Digital Lab
To scan documents on iPhone, use Scan Documents in an app that is already on it. In Notes, tap the Attachment button, then Scan Documents, and the scan is saved in that note as a PDF. In Files, tap the More button, then Scan Documents, and choose a folder to save it in. In iOS 26 and iOS 27, the Preview app on iPhone has Scan Documents too. If you use a Mac, you can start from the Mac instead: Control-click a folder in the Finder, choose Import from iPhone or iPad, then Scan Documents, and the PDF goes straight into that folder.
Key points
- Notes: in a note, tap the Attachment button, then Scan Documents. Apple says the scan is saved in that note as a PDF, so if you can’t find it in Photos, look in the note.
- Files: tap the More button, then Scan Documents. At the end you choose a location and tap Save, and you get a PDF file.
- Preview on iPhone (iOS 26 and iOS 27): tap Scan Documents, and the scan becomes a PDF.
- From a Mac: Control-click a folder in the Finder, choose Import from iPhone or iPad, then Scan Documents. The PDF lands in that folder on the Mac. Apple says the scan is not saved on the iPhone.
- Your iPhone finds the edges of the page and straightens it. Several pages scanned in a row become one PDF.
The diagram below sums up the ways to scan documents on iPhone, and where each scan is saved.
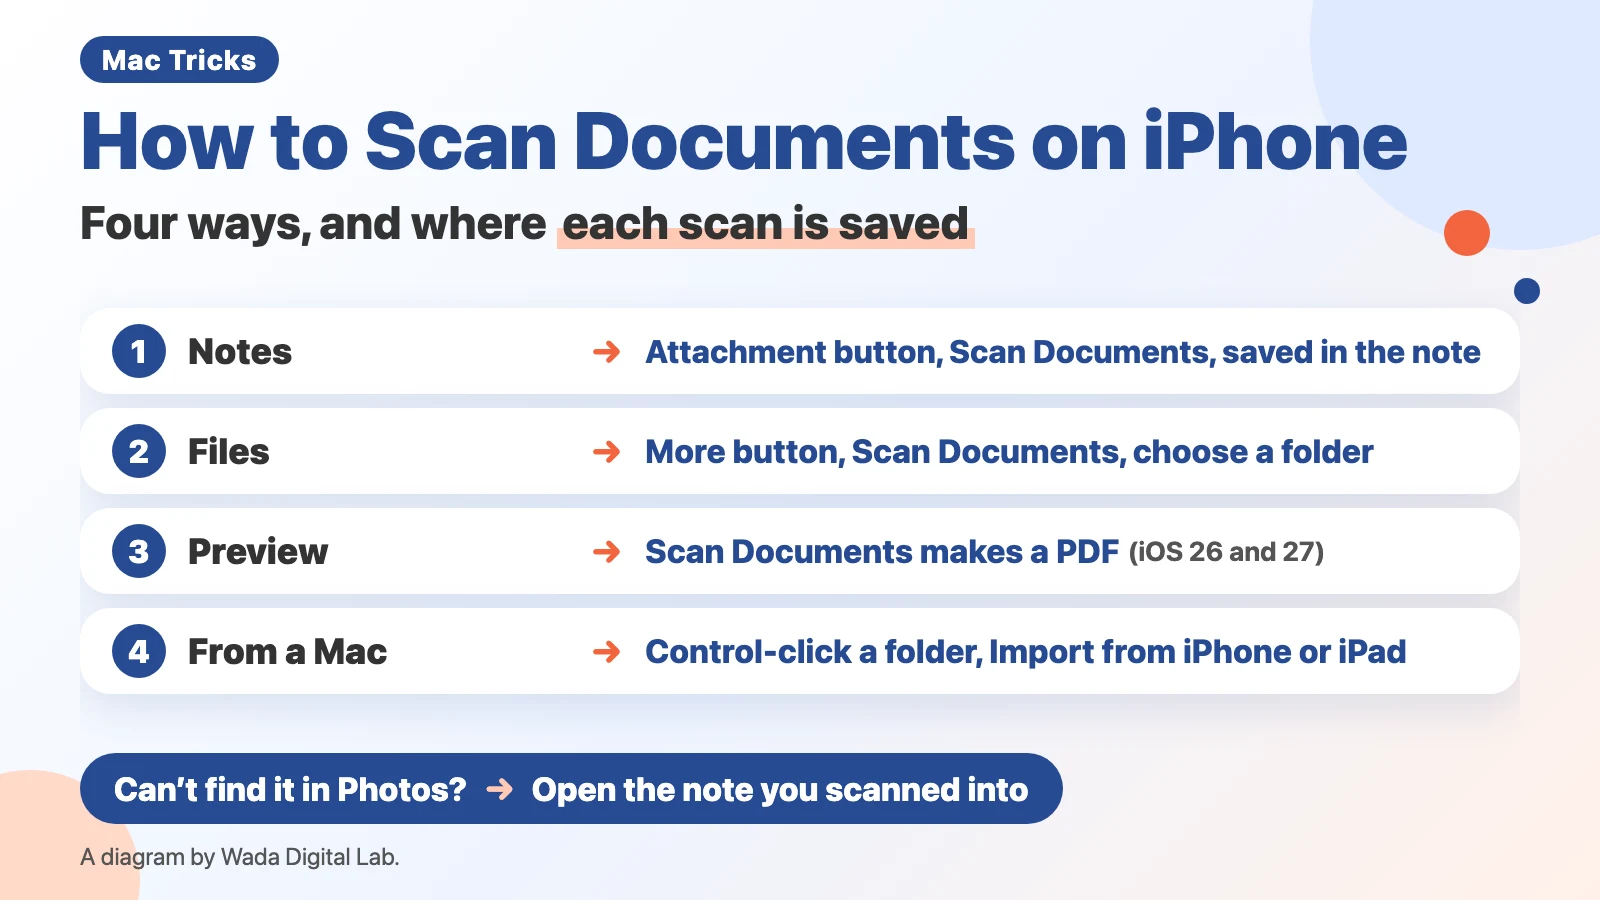
Four ways to scan, and where each scan is saved
Scan Documents is the iPhone camera mode made for paper. Apple’s Mac User Guide describes it this way: “Your iPhone or iPad detects the edges of the document and autocorrects any skewing of the image.” If you scan several pages in a row, they are saved together as one PDF. A plain photo does none of this.
We have scanned paper with an iPhone, and we have also installed scanning apps. These days we often just take a photo and ask Apple Intelligence or another AI to read the text. We think of that as a stopgap, though. The table below shows the four ways, and where each one puts your scan.
| Way | Where you start | Where the scan is saved | Good for |
|---|---|---|---|
| Notes | The Attachment button in a note | In that note (as a PDF) | Keeping the scan with your notes |
| Files | The More button | The folder you choose (a PDF file) | Sending or keeping the scan as a file |
| Preview on iPhone (iOS 26 and iOS 27) | Scan Documents in Preview | A PDF (Apple does not name the location; you can move it) | Working with the PDF in Preview |
| From a Mac (Continuity Camera) | Control-click a folder in the Finder | That folder on the Mac (not on the iPhone) | Documents you use on the Mac |
Scan a document in Notes: Attachment button, then Scan Documents
We split Apple’s steps into one action per line. There are 6 steps.
- Open Notes, and select a note or create a new one.
- Tap the Attachment button, then tap Scan Documents.
- Place your document in view of the camera.
- In Auto mode, keep your iPhone steady. It captures the page by itself when it finds the edges.
- To capture it yourself, tap the Shutter button or press a Volume button, drag the corners to fit the page, then tap Keep Scan.
- Scan the next page, or tap the Done button.
When you capture a page yourself, Apple’s support article calls the button that keeps it Keep Scan. The iPhone User Guide for iOS 27 says to tap Retake or Keep. To fix the edges of a page that was captured automatically, the guide says to tap the thumbnail and choose Adjust.
Apple also mentions a second way: in an open note, tap the More button, then tap Scan. In iOS 17 and earlier, the steps in Notes are different (see Apple’s iPhone User Guide for iOS 17). If you cannot find Scan Documents, check your iOS version.
Apple says “The document is saved as a PDF in the note.” Inside the note, you can rotate a page, crop it, or apply a filter. The Menu button on the PDF in the note also lets you copy, share, rename or delete it. To send the scan to another app, use share.
Can’t find the scan in Photos? It is in the note
Apple says a scan made in Notes is saved in the note as a PDF. If you looked for it in the Photos app, open the note you scanned into instead. In Settings > Apps > Notes there is a Save to Photos switch, but Apple describes it as “Save photos and videos taken in Notes to the Photos app.” It does not say whether scanned documents go to Photos too, and we have not tried it. If you want to keep a scan as a file, save it as a PDF in Files instead.
Scan a document in Files: More button, then Scan Documents
In Files, the scan is a PDF file from the start. There are 6 steps.
- Open Files and tap the More button.
- Tap Scan Documents.
- Place your document in view of the camera (in Auto mode, it is captured by itself).
- To capture it yourself, tap the Shutter button or press a Volume button, drag the corners to fit the page, then tap Keep Scan.
- Scan the next page, or tap the Done button.
- Choose a location, then tap Save.
Scan a document in Preview on iPhone
Apple’s iPhone User Guide for iOS 26 and iOS 27 has a page for scanning in the Preview app on iPhone. There are 5 steps.
- Open the Preview app on your iPhone.
- Tap Scan Documents.
- Position the camera so the document is on the screen. The page is captured automatically (tap Auto to switch to Manual, then tap the Shutter button, if you want to capture it yourself).
- Scan more pages the same way. Tap a thumbnail to crop, rotate or adjust the color.
- Tap the done button when you are finished.
According to Apple, the scan becomes a PDF. Apple’s pages do not name where it is saved. To put it somewhere else, Apple’s page on saving files in Preview says to open the PDF, then tap the Actions Menu button next to the file name, tap Move, then tap the Actions Menu button next to Preview and select a new location. We have not tried Preview on iPhone ourselves.
Scan from your Mac with Continuity Camera: Control-click a folder, Import from iPhone or iPad
If the document is for your Mac, start on the Mac, and the scan goes straight into a folder there. Apple calls this Continuity Camera. There are 4 steps.
- On your Mac, Control-click the desktop or a folder in a Finder window.
- In the menu that appears, choose Import from iPhone or iPad, then Scan Documents under the iPhone you want to use.
- The camera opens on your iPhone. Place the document in view and tap Keep Scan.
- When you have scanned all the pages, tap Save on your iPhone.
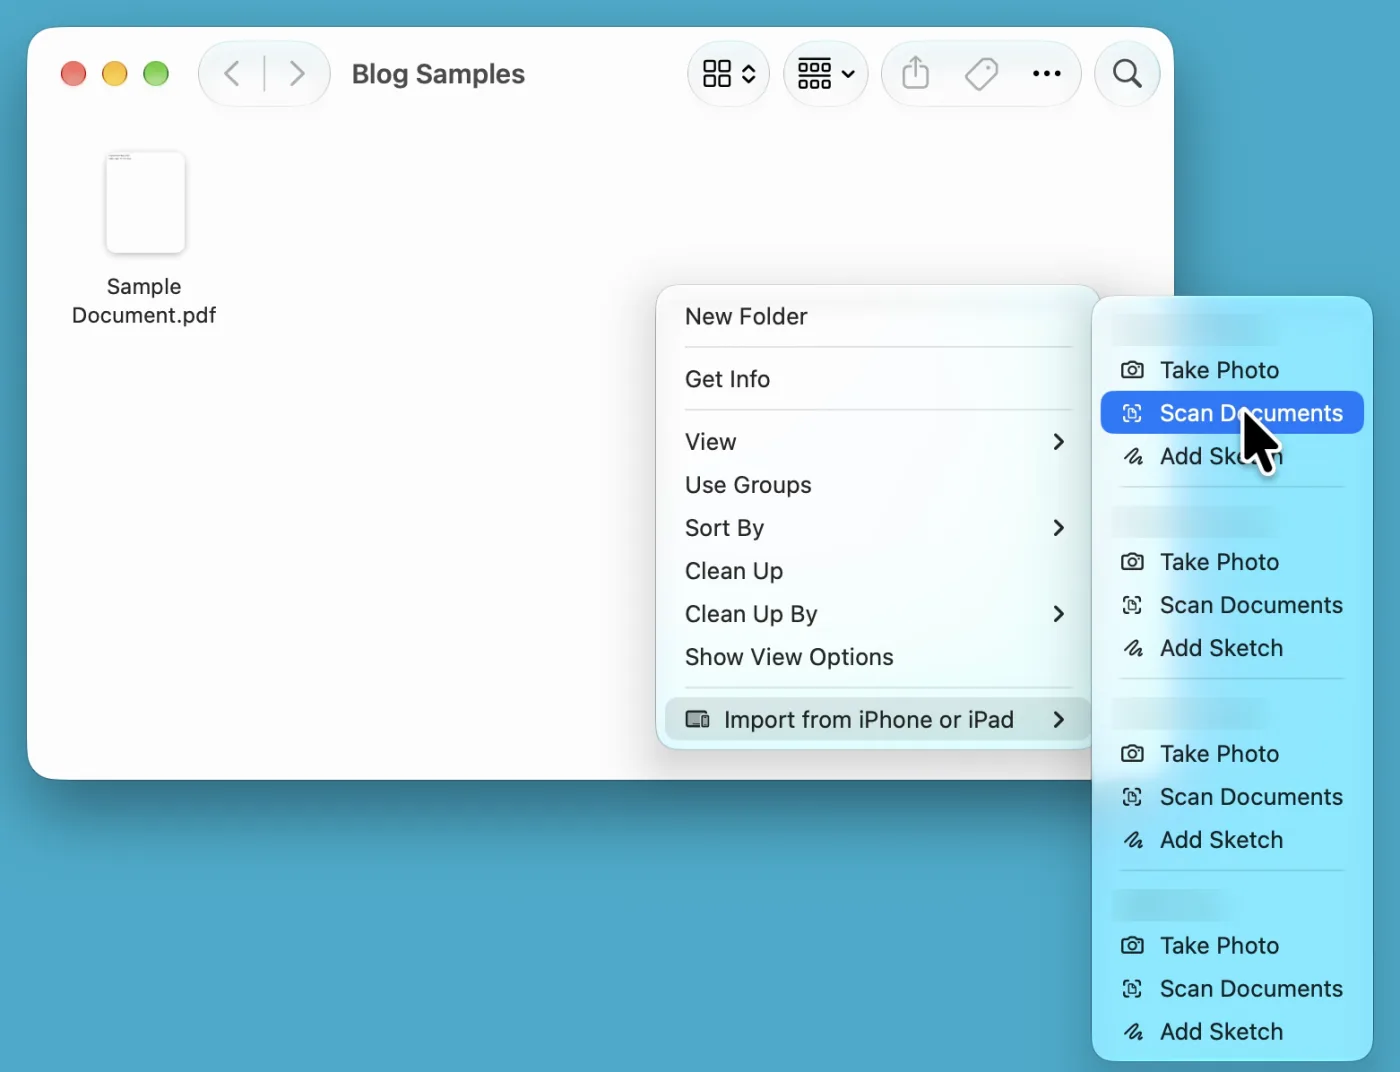
The name on screen and the name in Apple’s guide are not the same. The Mac User Guide says “Insert from iPhone or iPad”, but on our Mac the Finder menu said Import from iPhone or iPad. Both names are in the text built into macOS, and Apple’s pages use Insert, for example for Mail and Notes. Preview on the Mac has the same Import from iPhone or iPad item in its File menu.
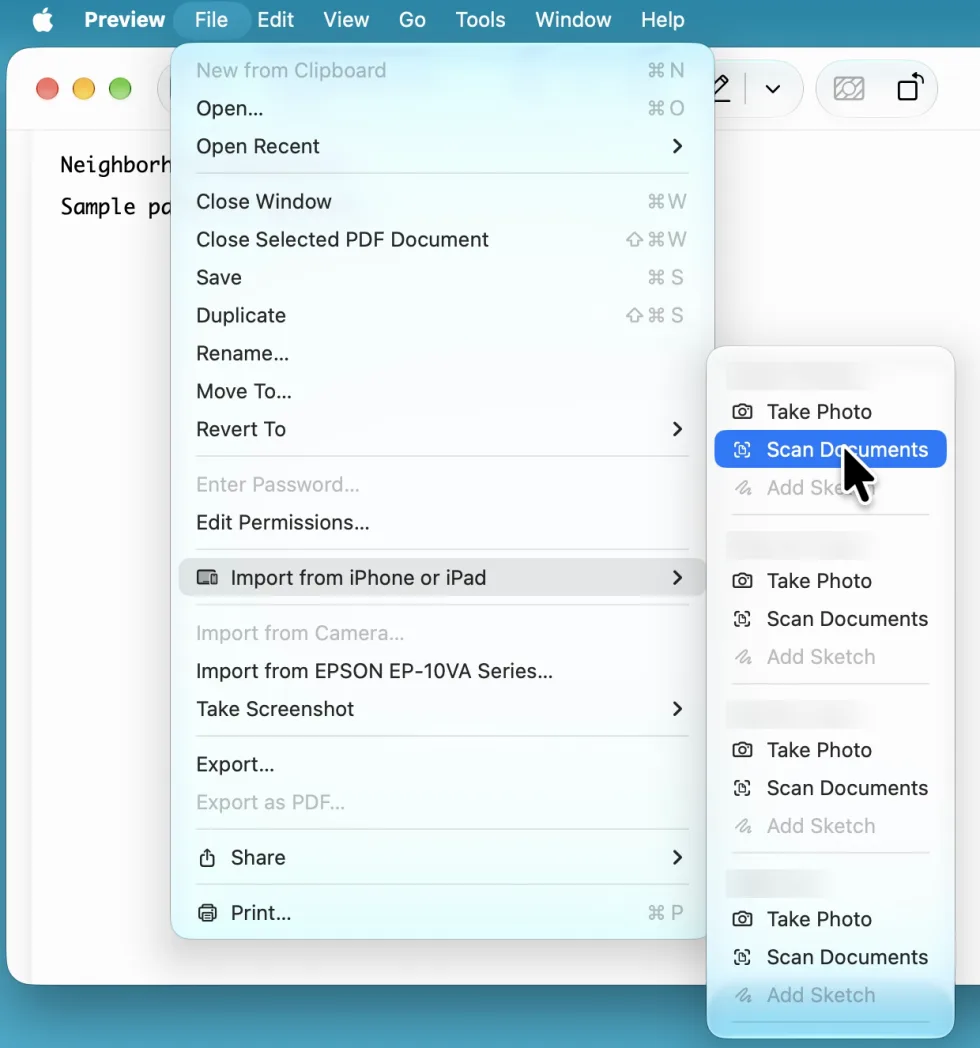
The scan arrives as a file in the place you chose in step 1. Apple says “Scans you take on your iPhone and iPad aren’t saved on the device.” In Mail or Notes on the Mac, Control-click inside the message or note to put the scan right there.
Apple lists these conditions:
- Both devices have Wi-Fi and Bluetooth turned on.
- Both devices are signed in to the same Apple Account, with two-factor authentication.
- The devices are within 30 feet (10 meters) of each other.
- The Mac has macOS Mojave 10.14 or later, and the iPhone has iOS 12 or later. iPhones with a version of iOS earlier than 12 cannot use it.
- The Mac is a MacBook introduced in 2015 or later, a Mac Pro introduced in 2013 or later, or another Mac model introduced in 2012 or later.
- Apple also says to make sure the Mac is using the latest version of macOS.
The diagram below shows how to choose by where you want the scan to end up. Notes starts from the Attachment button and is for keeping a scan with your notes: it is saved in the note as a PDF. To keep it as a file, use Files. Files starts from the More button, and you choose a location at the end, so the PDF goes into the folder you choose. To use it on a Mac, use Continuity Camera. Continuity Camera starts from a Finder folder, and nothing is left on the iPhone: the PDF goes into the folder on the Mac.
Preview on iPhone (iOS 26 and iOS 27) is not in this diagram. It is the way to use when you want to work with the PDF in Preview.
Notes
Starts from the Attachment button For keeping a scan with your notes
It is saved in the note as a PDF
To keep it as a file
Files
Starts from the More button You choose a location at the end
The PDF goes into the folder you choose
To use it on a Mac
Continuity Camera
Starts from a Finder folder Nothing is left on the iPhone
The PDF goes into the folder on the Mac
Frequently asked questions
How do I scan a document and send it by email?
Scan it in Notes or Files, then send the PDF with the share button. On a Mac, Mail is one of the apps that work with Continuity Camera: Control-click inside a new message and choose Scan Documents. Apple says “Your scans appear as a PDF in the window on your Mac.”
Scanning from my iPhone to my Mac does not work.
Check the conditions above: Wi-Fi and Bluetooth on both devices, the same Apple Account with two-factor authentication, within 30 feet (10 meters), the minimum versions, and the latest macOS on the Mac. Apple’s Mac User Guide gives the same checks for when Continuity Camera isn’t working.
The scanned PDF is too large.
On a Mac, open the PDF in Preview and make it smaller when you export it. The steps are in How to Make a PDF Smaller on a Mac.
A scanned page came out sideways.
In Notes, set the PDF to Medium or Large in View As, tap the thumbnail of the page, tap the More button, then choose Rotate Left or Rotate Right (according to Apple). View As is under the Menu button on the PDF in the note. After the PDF is on your Mac, you can rotate it in Preview. Our scans sometimes come out sideways or upside down too, and we fix them by hand each time. The steps are in the rotating section of How to Combine PDFs on a Mac.
Is a photo good enough?
To keep something for a short time, a photo is fine. We often take a photo first and ask an AI to read the text. But a photo is one file per page, and it stays crooked if you took it at an angle. If you will send a document of several pages to someone, or look for it later, a PDF made with Scan Documents is easier to handle. If you cannot copy the text out of a scanned PDF, see Can’t copy text from a scanned PDF.
What we tested on, and Apple’s pages
The iPhone steps come from Apple’s support article and the iPhone User Guide (iOS 27 and iOS 26). We did not go through them on an iPhone screen for this article. On the Mac side, on November 2, 2026, we opened the Finder menu and the File menu in Preview on a MacBook Air (M2) that we use for recording screens, with a separate user account made for that and set to English (US), and photographed them. The English menu names were also checked against the English text built into macOS on our MacBook Air (M4) (macOS 27.0.1). We did not try the part after the menu, where the iPhone scans and the PDF arrives on the Mac.
- Mac (menus, English (US)): MacBook Air (M2), macOS Golden Gate 27.2, November 2, 2026
- Mac (English names in macOS): MacBook Air (M4), macOS Golden Gate 27.0.1, November 2, 2026
Before writing, we searched Google (US) for “how to scan documents on iphone” on November 2, 2026. We read the two Apple pages at the top (Notes, and Preview on iPhone) and saw only the titles of the others. The two Apple pages did not compare where each scan ends up, or show how to start from a Mac.
- How to scan documents on your iPhone or iPad (Apple Support)
- Scan text and documents in Notes using the iPhone camera (iPhone User Guide)
- Work with PDFs in Notes on iPhone (iPhone User Guide)
- Change your Notes settings on iPhone (iPhone User Guide)
- Scan text and documents in Preview on iPhone (iPhone User Guide)
- Save, rename, or move PDFs and images in Preview on iPhone (iPhone User Guide)
- Continuity Camera: Use your iPhone or iPad to scan documents or take a picture on your Mac (Apple Support)
- Insert sketches, photos, and scans from iPhone or iPad on Mac (Mac User Guide)