How to Use Final Cut Pro for Beginners — Cut Your iPhone Videos, Add Text and Music, and Export to MP4
Published November 11, 2026
Steps checked November 11, 2026 (MacBook Air (M2), macOS Golden Gate 27.2)
By Wada Digital Lab
When you edit your first video in Final Cut Pro, the two moves to learn first are cutting (Command-B) and deleting (Delete). Send your iPhone videos to your Mac with AirDrop, use Import Media to add them to an event in Final Cut Pro, and drag them into the timeline of a new project. After you cut and delete, add text with Basic Title and put music below the video. Finally, click the Share button, choose Export File, and set Format to Computer to get an MP4 file. We checked every step from importing on the Mac to exporting the MP4 on the Mac we used for our recordings (macOS 27.2, Final Cut Pro 12.4, English menus). The iPhone side of AirDrop is described from Apple’s guide.
Key points
- Bring in your videos: send iPhone videos to your Mac with AirDrop, and they usually land in the Downloads folder. In Final Cut Pro, choose File > Import > Media, select the folder, and click Import All.
- Create a project: choose File > New > Project. If you see detailed settings, click Use Automatic Settings first, then click OK.
- Cut and delete: point at the spot in the timeline you want to cut (a red vertical line follows the pointer), press Command-B, then select the part you don’t need and press Delete. Delete closes up the space, so later clips move left. Shift-Delete leaves a gray gap instead. Press Command-Z to undo a mistake.
- Text and music: drag Basic Title from Titles and Generators above the video, and drag a song below the video. Drag the horizontal line inside the music clip down to make the music quieter.
- Export: click the Share button, choose Export File (default)…, set Format to Computer under Settings, and click Next. In our recording, the file extension was .mp4.
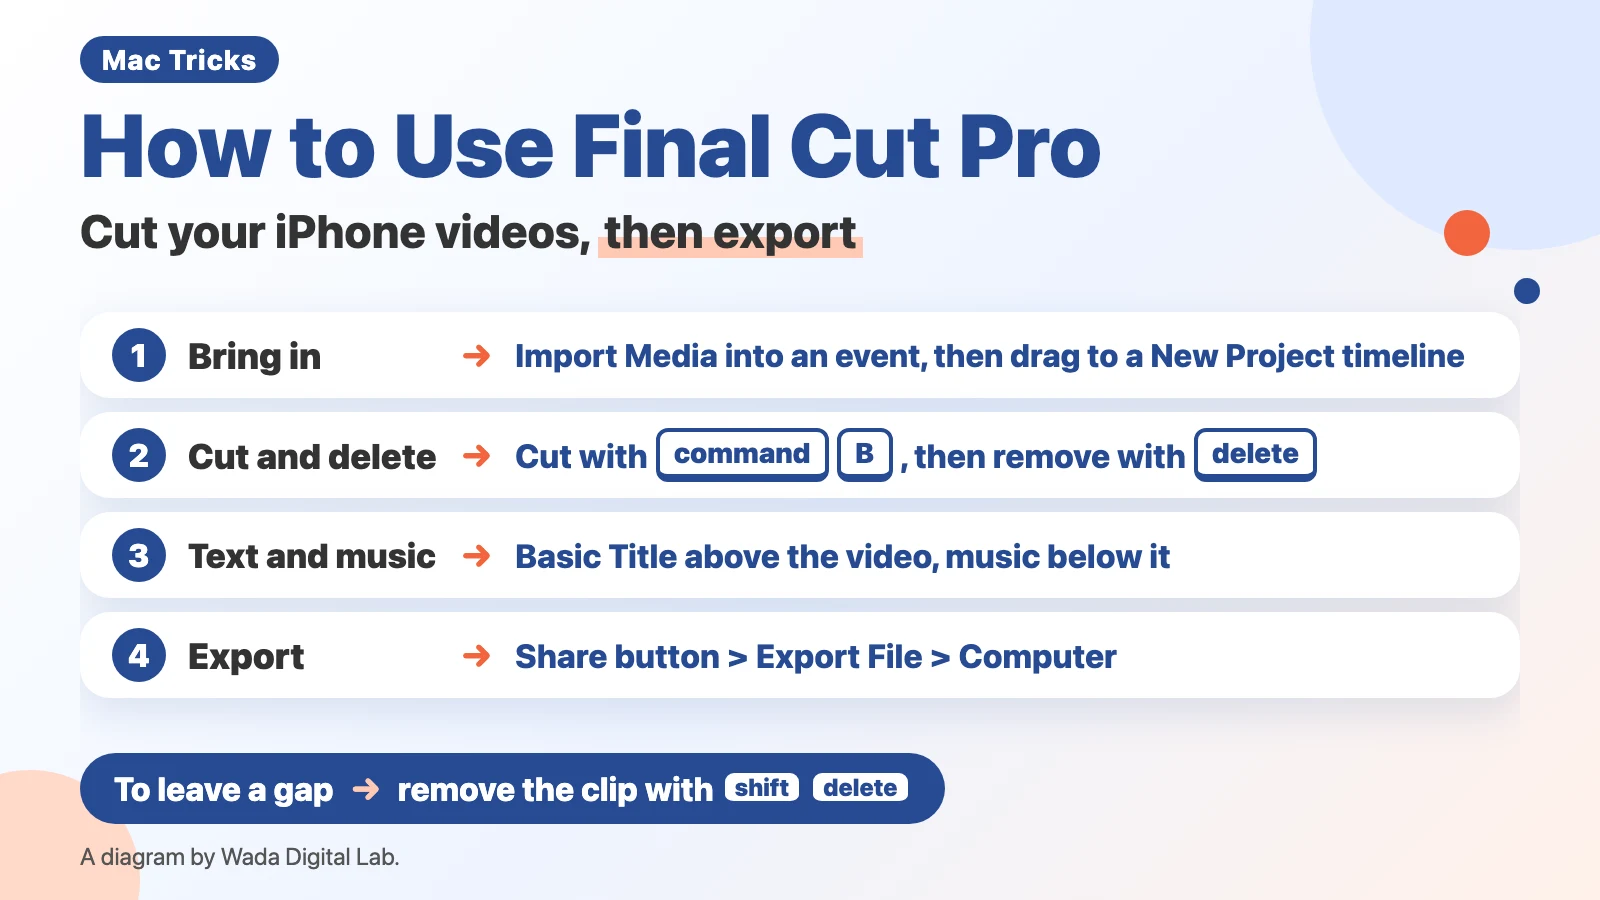
The diagram below sums up the steps from bringing in your iPhone videos to exporting.
This article was written by Wada Digital Lab, which is not affiliated with Apple. It is not a paid promotion.
What is Final Cut Pro? A Mac app for cutting videos and adding text and music
Final Cut Pro is Apple’s video editing app for the Mac. You can cut out the parts of your videos you don’t need, join the rest, add text and music on top, and export everything as one video file.
In Final Cut Pro, the videos you import go into an event, and you edit in a project. When an event has no project yet, the Final Cut Pro window shows Create Project with the words “A project is a timeline where you can arrange and edit your media.” It helps to think of an event as the place where your clips wait, and a project as the video you are making. For more on how libraries, events, and projects differ, and which import setting to choose for your first videos, see Final Cut Pro Library vs. Event vs. Project.
Apple also makes iMovie, a simpler video editing app. At Wada Digital Lab, we used to make our videos in iMovie, but it could not do enough of what we wanted. A movie project made in iMovie can be sent to Final Cut Pro (Apple’s guide “Import into Final Cut Pro for Mac from iMovie for macOS”).
Bring your iPhone videos to your Mac: send them with AirDrop, then import them into an event
A quick way to get iPhone videos onto your Mac is AirDrop. Turn on Wi-Fi and Bluetooth on both your iPhone and your Mac. On the Mac, open Control Center in the menu bar, click AirDrop so it turns blue (on), and check who you can receive from (Contacts Only or Everyone). Apple’s Mac User Guide (“Use AirDrop to send items to nearby Apple devices”) lists this condition: “Your devices are within 30 feet (10 meters) of each other.”
On your iPhone, select the video in Photos, tap the Share button, choose AirDrop, and pick your Mac. According to the same guide, “On a Mac, some items are automatically saved in the Downloads folder,” and you may get a choice of where to save them.
In our English recording, we showed the Share button and the share sheet in Photos on an iPhone simulator (a test iPhone screen that runs on the Mac). We did not film the AirDrop send itself. On the Mac, the iPhone video (IMG_2041.MOV) was already in the Downloads folder. You can also connect your iPhone with a cable and choose it under Cameras in the Media Import window (Apple’s guide “Import into Final Cut Pro for Mac from iPhone, iPad, or iPod touch”; we have not tried this).
The first time you open Final Cut Pro, you create a library, the file that holds your videos. Apple’s guide (“Create a new project in Final Cut Pro for Mac”) says: “If you’re opening Final Cut Pro for the first time, click Create Library, enter a name, then click Save.” Imported videos go into an event inside the library (a group for your clips, often named by date). In our recording, the library was called My First Library, and it had an event named 11-11-26.
To import a video from the Downloads folder:
- Choose File > Import > Media. You can also click the Import button (the down arrow) in the Final Cut Pro toolbar and choose Media.
- In the Media Import window, open the Downloads folder and find your video.
- At the top right, choose the event under Add to existing event.
- Click Import All at the bottom right.
In our recording, IMG_2041.MOV was the only file in the Downloads folder. After Import All, it joined the clips already in the event 11-11-26.
Create a new project: skip the detailed settings and click OK with automatic settings
Next, create the video you will edit (the project). For your first video, you don’t need to decide on detailed numbers such as the resolution (how sharp the picture is) or the rate (how many frames per second).
- In the Libraries sidebar on the left, select the event that has your videos.
- Choose File > New > Project (or press Command-N). You can also click the plus button in the toolbar and choose New Project….
- Type a name in Project Name (we used My First Edit).
- If you see detailed Video, Rendering, and Audio settings, click Use Automatic Settings at the bottom left.
- Click OK.
The screenshot below shows the window with the automatic settings.
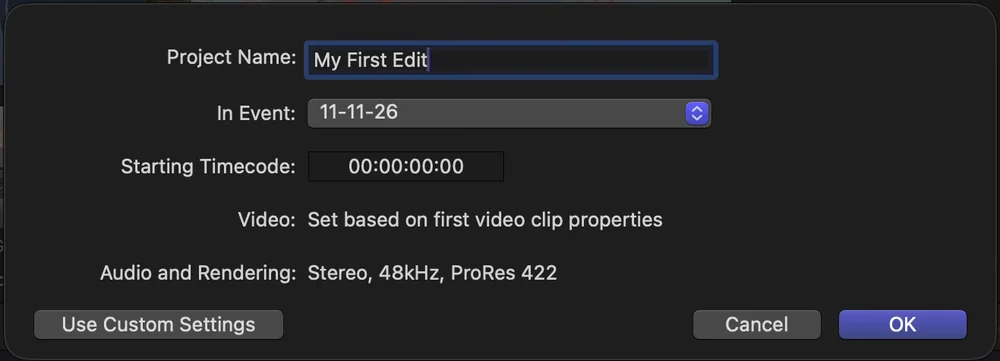
In our recording, the window opened with the automatic settings: Video said “Set based on first video clip properties,” and the button at the bottom left said Use Custom Settings. Clicking Use Custom Settings showed the detailed settings, and Use Automatic Settings brought the short window back. After OK, the empty timeline said “Drag media here to get started.”
Apple’s guide (“Create a new project in Final Cut Pro for Mac”) notes: “Final Cut Pro shows the automatic settings by default, but it retains the settings you used last, so this step may be unnecessary.” If your Mac made a project with custom settings before, the detailed settings appear first. In that case, click Use Automatic Settings to go back to the automatic settings.
Add clips to the timeline: click a clip so a yellow outline surrounds all of it, then drag
- In the browser (the area where your imported clips appear), click a clip.
- Check that a yellow outline surrounds the whole clip.
- Drag it down to the timeline.
A common snag is when only part of a clip is selected. If you drag across a clip in the browser, only that range is selected. Apple’s guide (“Select ranges in Final Cut Pro for Mac”) says: “A yellow border appears around the range you selected.” If the yellow outline stops partway through the clip, only that part goes into the timeline.
When that happens, press Option-X to clear the selection, then click the clip again (Option-X is the shortcut for Mark > Clear Selected Ranges). In our recording, we pressed Option-X on a clip with only part of it selected, clicked it again to select all of it, and dragged it to the timeline.
Clips in the timeline snap together with no space between them. Final Cut Pro calls this the Magnetic Timeline.
Cut and delete: cut with Command-B, and Delete closes up the space
Cutting out the parts you don’t need is the most basic step in editing.
- Point at the spot in the timeline where you want to cut. A red vertical line (the skimmer) follows the pointer.
- Press Command-B. The clip splits in two at that spot. Each piece is called a clip.
- Click the part you don’t need to select it, then press Delete.
In our recording, we pointed partway into IMG_2041 and pressed Command-B, and it split into two clips. We then selected the first piece and pressed Delete, and the clips after it (the second piece and Golden-Gate) moved left to close the space.
Apple’s guide (“Remove clips from projects in Final Cut Pro for Mac”) describes Delete this way: “The selected clips or portions of clips are removed from the timeline, and any clips to the right of the selection ripple to close the resulting gap.” To ripple means the later clips shift left so no gap is left.
The first method in Apple’s guide (“Cut clips in two in Final Cut Pro for Mac”) is the Blade tool: choose Blade from the Tools pop-up menu (or press B), then click where you want to cut. Command-B appears in the same guide in the section “Cut multiple selected clips at once” (as the shortcut for Trim > Blade), and as a way to cut while the project plays. The guide also says: “If you don’t make a selection, this command acts only on the clip in the primary storyline.” The primary storyline is the main row of clips in the timeline. For a first video with your clips in one row, pointing and pressing Command-B is all you need. If another clip is selected (it has a yellow outline), Command-B acts on that selection, so click the clip you want to cut first.
If no red line follows the pointer, skimming (where the picture follows the pointer as you move it) is turned off. Apple’s glossary entry for the skimmer says: “When skimming is turned off or the skimmer is not present in a clip, the playhead assumes the default position.” The playhead is the white vertical line that marks where the timeline is playing. In that case, Command-B cuts at the white line.
To leave a gap, remove the clip with Shift-Delete (Replace with Gap)
Sometimes you want to remove a clip but keep the space where it was. Then press Shift-Delete instead of Delete. In the menus, it is Edit > Replace with Gap. Apple’s guide explains: “If you want to remove clips from the timeline but still maintain the total project duration and timing, you can replace clips with gap clips.”
In our recording, we first cut off the last moment of IMG_2041 with Command-B. Then we selected the rest of IMG_2041 and pressed Shift-Delete. As the screenshot below shows, the removed part became a gray gap, and the short piece and Golden-Gate did not move.
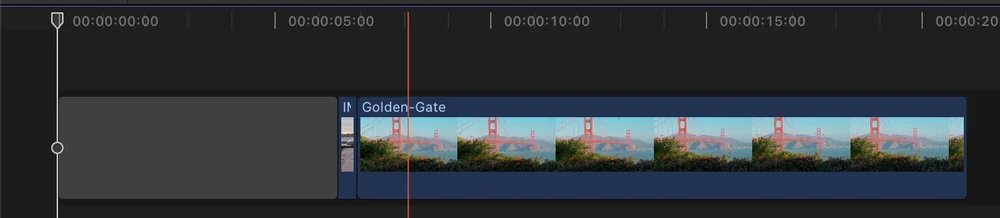
When you remove a clip with Delete, the later clips close up the space. No gap is left, so the video gets shorter. When you remove a clip with Shift-Delete, the removed part becomes a gray gap. The later clips don’t move, so the length stays the same. The diagram below compares the two.
Remove with Delete
The later clips close up the space No gap is left
The video gets shorter
Remove with Shift-Delete
The removed part becomes a gray gap The later clips don’t move
The length stays the same
Made a mistake? Press Command-Z to go back one step
If you cut too much or delete the wrong clip, press Command-Z to go back one step. Apple’s guide says: “To undo the deletion immediately, choose Edit > Undo (or press Command-Z).” Press it again to go back further. If you only want to shorten the start or end a little, you can also drag the edge of the clip in the timeline instead of cutting.
Add text: drag Basic Title above the video in the timeline
- Click the Titles and Generators button (the T-shaped button) at the top left of the window.
- Type Basic Title in the search field above the browser.
- Drag Basic Title above the video in the timeline. The word “Title” appears over that scene.
- Select the title, then in the inspector on the right (the area where you change settings for what you selected), select the text under Text and type your own words.
In our recording, we placed Basic Title above the first clip and typed My Trip in the inspector. The text in the viewer (the area that shows the video) changed to My Trip too. Dragging the right edge of the title made it stay on screen longer, from about 10 seconds to about 12 seconds.
Apple’s guide (“Add titles in Final Cut Pro for Mac”) also lists a way to place a title at the playhead without dragging: “Choose Edit > Connect Title > Basic Title (or press Control-T).” We have not tried it. To keep text readable over a bright sky and reuse its look, see How to Add Text in Final Cut Pro.
Add music: drag it below the video, then lower the line to make it quieter
- Import the music file the same way as your videos.
- Drag the song from the browser to below the video in the timeline.
- If the music is too loud, drag the horizontal line inside the music clip down. The lower the line, the quieter the music.
Apple’s guide (“Adjust volume in Final Cut Pro for Mac”) calls this line “the volume control (the horizontal line across the audio waveform)” and says: “As you drag, the volume level in dB appears, and the waveform changes shape to reflect your adjustments.” Lower it until you can clearly hear the voices in your video.
If the video is going to YouTube, choose music that says you are allowed to use it. In our recording, the song (Gymnopedie No.3) was longer than the video, so before exporting we cut it at the end of the video. To do the same, select the music clip, point at the end of the video, and press Command-B. Then select the part of the music after the cut and press Delete.
Export: Share button > Export File > set Format to Computer
- Click the Share button (a square with an arrow coming out of it) at the top right of the window.
- Choose Export File (default)….
- Click Settings, then choose Computer from the Format menu.
- Click Next, choose where to save the file, and click Save.
The screenshot below shows the Format menu open.
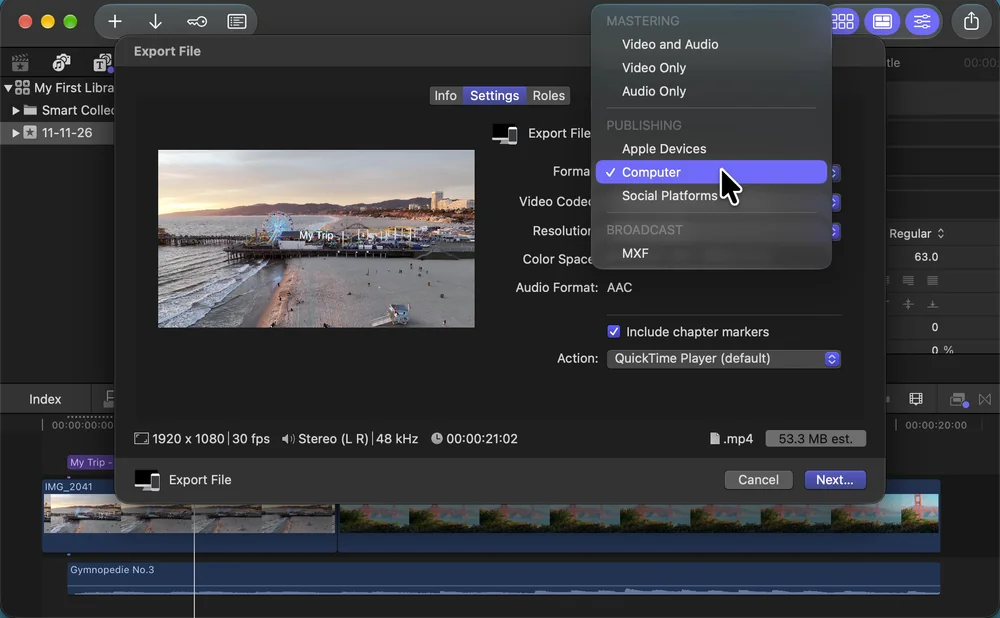
For our 21-second video, choosing Computer set Video Codec to H.264 Single-pass (Faster), the resolution to 1920 x 1080, the extension to .mp4, and the size to 53.3 MB est. Action was left at QuickTime Player (default), so when the export finished, the exported video opened in QuickTime Player.
Apple’s guide (“Export File and Apple Devices destinations in Final Cut Pro for Mac”) says the Format menu “Lists mastering formats (Video and Audio, Video Only, Audio Only) and publishing formats, including Apple Devices (such as iPhone and iPad), Computer (for playback on Mac and PC), and Web Hosting (such as YouTube or Vimeo).” But on our recording Mac (Final Cut Pro 12.4), the Format menu had no Web Hosting. Under Publishing, it showed three items: Apple Devices, Computer, and Social Platforms. We have not tried Social Platforms. We exported an MP4 file with Computer, but we did not upload that file to YouTube in our recording.
Upload to YouTube: Create > Upload videos in YouTube Studio
To upload the exported file, open YouTube Studio, click Create, choose Upload videos, and select the file. In our recording, we went as far as opening the upload window (we did not upload anything). If you record your Mac screen for a video, How to record audio with a Mac screen recording explains how to include the sound.
Final Cut Pro basics at a glance
| What you want to do | What to press | What happens |
|---|---|---|
| Import videos | File > Import > Media > Import All | The videos appear in the event |
| Create a project | File > New > Project > OK (if detailed settings appear, click Use Automatic Settings first) | An empty timeline appears |
| Undo a partial selection | Option-X (Mark > Clear Selected Ranges) | The yellow outline goes away |
| Cut | Point at the spot and press Command-B | The clip splits in two there |
| Remove and close up | Delete | The later clips move left |
| Remove and leave a gap | Shift-Delete (Replace with Gap) | The removed part becomes a gray gap |
| Go back one step | Command-Z | Your last step is undone |
| Add text | Titles and Generators > drag Basic Title above the video | Text appears over that scene |
| Make the music quieter | Drag the line inside the music clip down | The music gets quieter |
| Export | Share button > Export File (default)… > Computer > Next | You get an MP4 file |
Frequently asked questions
Only part of my iPhone video goes into the timeline. Why?
Only part of the clip was probably selected in the browser. If the yellow outline stops partway through the clip, press Option-X to clear the selection, click the clip again so the yellow outline surrounds all of it, and then drag it to the timeline.
What is the difference between Delete and Shift-Delete?
Delete closes up the space, so the video gets shorter. Shift-Delete turns the removed part into a gray gap, so the length stays the same. Use Shift-Delete when you don’t want the timing of the other scenes to shift against your music or voice.
Should I choose Apple Devices or Computer when I export?
In Apple’s guide, Apple Devices is for devices such as iPhone and iPad, and Computer is for playback on Mac and PC. In our recording, we chose Computer and got an MP4 file. We did not upload that file to YouTube in our recording.
The music is so loud I can’t hear the voices. What do I do?
Drag the horizontal line inside the music clip down. The lower the line, the quieter the music. If you find it is still too loud after exporting, lower the line a little more and export again.
What we tested, and sources
- Recording Mac: MacBook Air (M2), macOS Golden Gate 27.2, Final Cut Pro 12.4, with English (US) menus. We used a recording user account with a new library (My First Library) and a new project (My First Edit). The clips were three videos from a stock video site with no rights issues (the Golden Gate Bridge, a New York street, and the Santa Monica Pier) and a recording of Gymnopedie No.3. The iPhone video IMG_2041.MOV was a copy of the Santa Monica Pier video. We recorded on November 11, 2026.
- What we saw in the English recording: the Share button and share sheet in Photos on an iPhone simulator. Importing IMG_2041.MOV from the Downloads folder with Import All. Creating a project with File > New > Project and clicking OK with the automatic settings. Clearing a partial selection with Option-X and dragging the clip to the timeline. Cutting with Command-B, removing with Delete so the later clips closed up, and removing with Shift-Delete so a gap was left. Placing Basic Title, typing new text, and dragging its edge. Placing the song below the video and lowering the line. Choosing Computer in Export File (default)…, exporting an MP4 file, and opening it in QuickTime Player. Opening the Upload videos window in YouTube Studio.
- The screenshots in this article come from recordings we made for our YouTube video.
What we have not tried on screen: sending from an iPhone with AirDrop (we did not film a real iPhone), importing from an iPhone connected with a cable, exporting with Social Platforms, adding a title with Control-T, and uploading to YouTube. For these, we followed Apple’s guides.
Apple’s guides:
- Create a new project in Final Cut Pro for Mac
- Select ranges in Final Cut Pro for Mac
- Cut clips in two in Final Cut Pro for Mac
- skimmer (Final Cut Pro User Guide glossary)
- Remove clips from projects in Final Cut Pro for Mac
- Add titles in Final Cut Pro for Mac
- Adjust volume in Final Cut Pro for Mac
- Export File and Apple Devices destinations in Final Cut Pro for Mac
- Import into Final Cut Pro for Mac from iPhone, iPad, or iPod touch
- Import into Final Cut Pro for Mac from iMovie for macOS
- Use AirDrop to send items to nearby Apple devices (Mac User Guide)
Mac, macOS, Final Cut Pro, iMovie, iPhone, AirDrop, and QuickTime are trademarks of Apple Inc. YouTube is a trademark of Google LLC. Wada Digital Lab is not affiliated with these companies.