How to Add Text in Final Cut Pro — Lower Thirds, a Black Outline That Stays Readable, and Copies with the Same Look
Published November 16, 2026
Steps checked November 12, 2026 (MacBook Air (M2), macOS Golden Gate 27.2)
By Wada Digital Lab
To add text in Final Cut Pro, move the playhead to where you want the text in the timeline and press Control-Shift-T. Unless you have changed the default, a Basic Lower Third, the title that sits at the bottom of the screen, is added above your video. White text is hard to read over a bright sky, so in the Text inspector, turn on Outline, set its color to black, and raise Width. For your next title, hold Option and drag the title to make a copy with the same look. We checked these steps on our recording Mac (macOS 27.2, Final Cut Pro 12.4).
Key points
- Add: Move the playhead and press Control-Shift-T to add a Basic Lower Third. You can also click the Titles and Generators button, open Lower Thirds, and drag it above your video.
- Change the words: Double-click the text in the viewer and type. To move the whole title, click Transform at the bottom left of the viewer, drag inside the frame, and click Done.
- Make it readable: In the Text inspector, select Outline, set Color to black, and raise Width. In our recording, a Width of 5.0 made the text easy to read. Turn on Drop Shadow too, and a shadow appears under the text.
- Reuse: Hold Option and drag the title to make a copy with the same outline and shadow. Double-click the text, press Command-A to select all of it, and type the new words.
- Titles vs. captions: A title is burned into the exported video and always shows. Text that viewers can turn on and off is a caption in Final Cut Pro. Generate Captions, which makes subtitles from speech, needs a Mac with a chip made by Apple (such as M1 or M4) and works only with U.S. English.
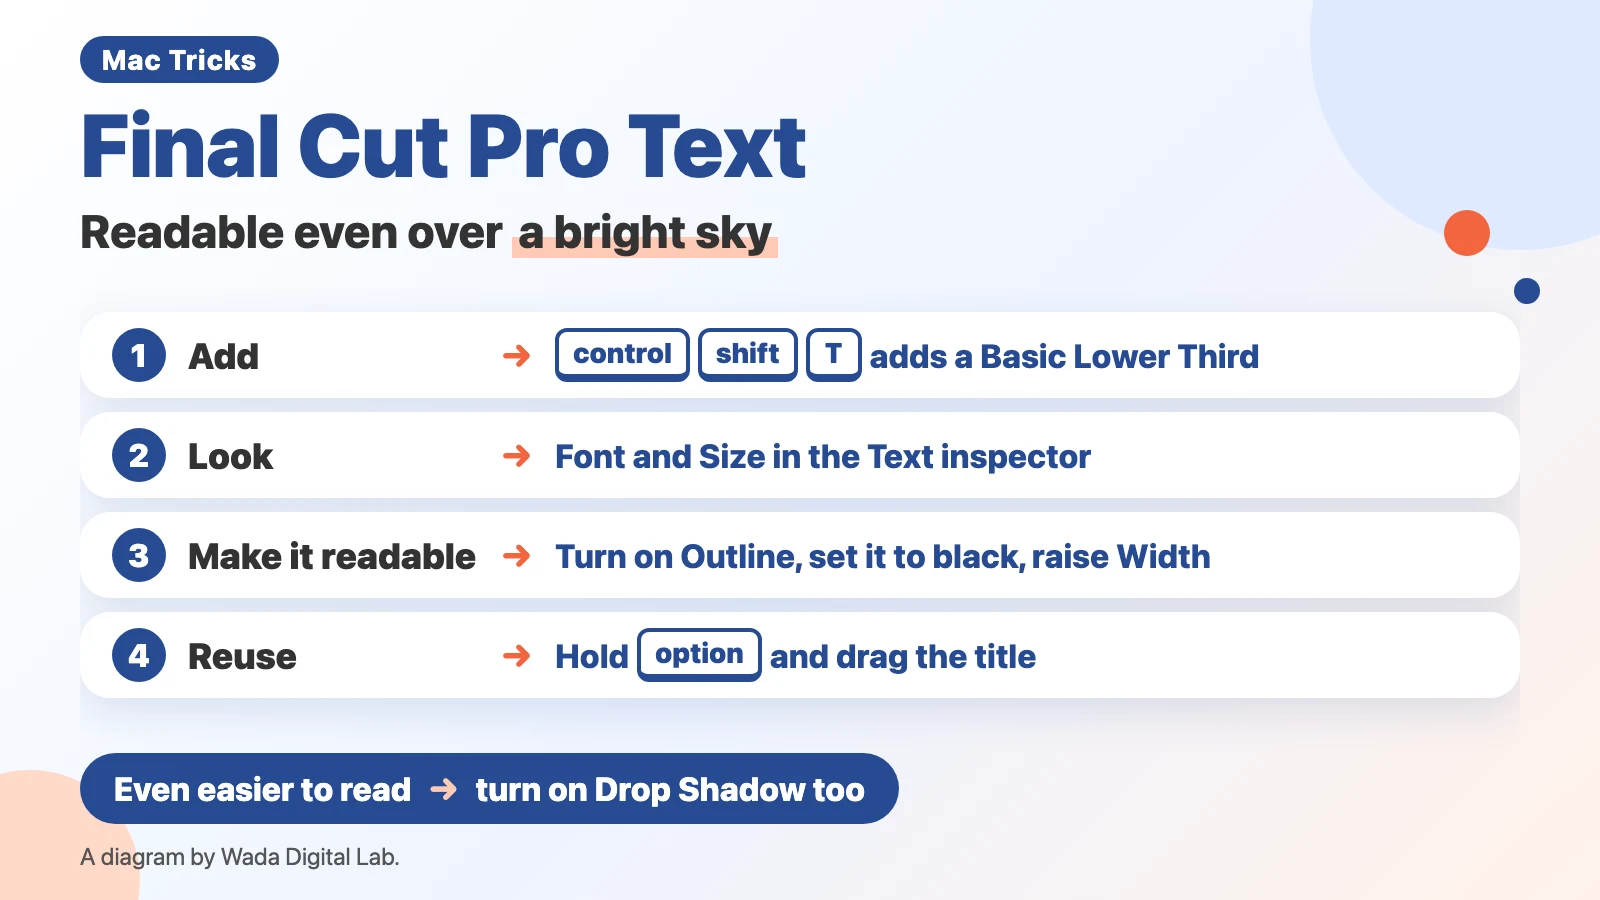
The diagram below sums up the steps from adding a title to making it readable and reusing it.
This article was written by Wada Digital Lab, which is not affiliated with Apple. It is not a paid promotion.
What text is in Final Cut Pro: a title, and a lower third at the bottom
Text in Final Cut Pro is a title: words laid over your video. There are many kinds of titles. For a place name or a short note at the bottom of the screen, use the kind called a lower third. The simplest one is Basic Lower Third. It has no animation or decoration, just two lines of text.
Back when we made videos in iMovie, we could not move the text, resize it, or change its color the way we wanted. We thought that was just how it worked, and we switched to another app. In Final Cut Pro, you can change the position, size, and color of a title after you add it. This article walks through how.
If you want to start with cutting and exporting, read How to Use Final Cut Pro for Beginners first.
Add a title: Control-Shift-T adds a Basic Lower Third
- Click the time ruler above the timeline to move the playhead (the vertical line that shows the current position) to where you want the text.
- Press Control-Shift-T. A Basic Lower Third is added above your video.
- The viewer (where your video plays) shows the placeholder text Name and Description.
In our recording, a Basic Lower Third appeared above the clip, and the playhead jumped to the end of the title. In our Japanese recording, with the playhead at 2 seconds, the title covered 2 to 12 seconds. Apple’s guide (Add titles) says the same: “Choose Edit > Connect Title > Basic Lower Third (or press Control-Shift-T).” Control-Shift-T adds the default lower third, which is Basic Lower Third at first. According to Apple’s guide (Add the default title), you can change this default to another title. If you have not changed it, you get Basic Lower Third.
Add it by dragging: Lower Thirds in Titles and Generators
- Click the Titles and Generators button above the browser.
- In the sidebar, click Lower Thirds under Titles.
- Find Basic Lower Third and drag it above your video in the timeline.
In our Japanese recording, Basic Lower Third was two scrolls down the Lower Thirds list. The Titles and Generators button sometimes switched only when we clicked a little above and to the right of the center of its icon.
Type your text and move it: double-click, then Transform
- Select the title in the timeline and move the playhead over it (somewhere within the time the title is on screen). The title appears in the viewer.
- Double-click Name in the viewer and type a place name or similar.
- Double-click Description and type a short note.
- When you finish typing, press Escape.
- To move the whole title, click the Transform button at the bottom left of the viewer, then drag inside the frame. Click Done at the top right when you finish.
In our recording, we typed Golden Gate Bridge on the top line and Morning in San Francisco on the bottom line. A double-click selects only one word. To replace longer text, double-click and then press Command-A to select all of it before you type.
Moving the title needs one extra step. In our Japanese recording, dragging the text in the viewer without clicking Transform moved only the line we clicked. The other line and the small decorative line stayed where they were. To move the whole title, click Transform first. In the English recording, we clicked Transform, dragged inside the frame, and clicked Done, and the whole title moved.
Change the font and size: Basic in the Text inspector
- If you do not see the inspector (the pane where you change settings for what you select), press Command-4.
- Click the Text button at the top of the inspector.
- In the Basic section at the top, choose a font from the Font pop-up menu. The pop-up menu to its right sets the weight.
- Click the line you want to resize in the viewer, then raise the Size value.
In our English recording, the first font was Helvetica Neue Medium. We opened the font list, typed the first letters of Avenir Next to jump to it, and chose Bold. We then selected only the top line and raised Size from 66 to 104.
Change the size one line at a time. With the whole title selected, Size showed -- because the two lines had different sizes. In our Japanese recording, typing a number at that point gave both lines the same size, and they overlapped.
Many people watch on a phone, so make the text a little larger than you think. Open the exported video on an iPhone to check that you can read it. For how many characters fit on one line, see Subtitle Characters per Line.
Keep text readable over a bright sky: a black Outline with a Width of 5.0
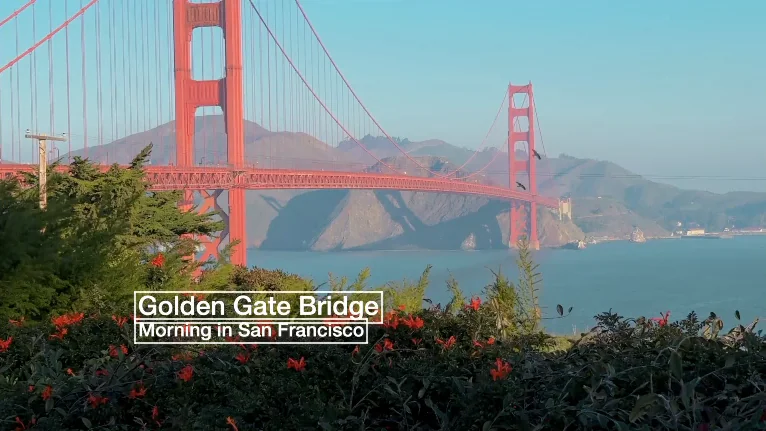
White text blends into a bright sky or a white wall and becomes hard to read. We have had trouble reading white text on a white wall in other people’s videos and on TV. The photo below shows a title with nothing added.
- Click the top line in the viewer, then hold Command and click the bottom line to select both.
- Scroll down in the Text inspector and select the Outline checkbox. An outline appears around the letters.
- Click the arrow to the right of Color under Outline and choose black.
- Raise Width a little at a time, and stop when the text is easy to read.
- Select the Drop Shadow checkbox below it too. A shadow appears under the text.
In our recording, the outline was red with a Width of 1.0 right after we turned it on. With Color set to black and Width at 5.0, the text was easy to read (Opacity stayed at 100% and Blur at 0). In the English recording, the title sat low, over trees and flowers. In our Japanese recording, the title sat over the bright sky, and the same settings made it easy to read there too. In both recordings, we added the outline before changing the font and size. The photo below shows the inspector at that point.
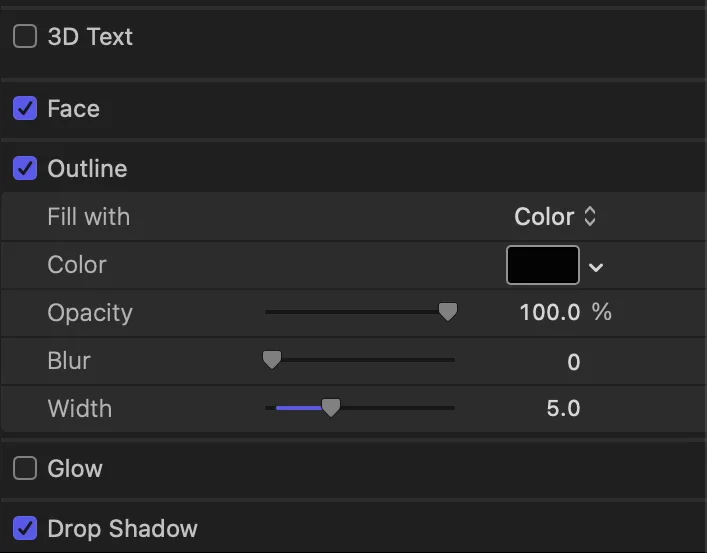
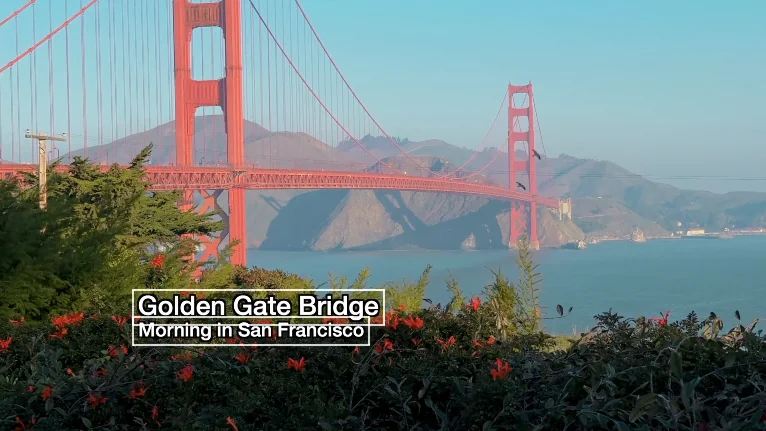
With both lines selected, the outline and the shadow were added to both lines at once. In our Japanese recording, selecting the whole title without selecting any text also added them to both lines. The diagram below compares the title before and after the outline.
Before the outline
White text blends into a bright sky The letters look faint
Hard to read over a bright area
With Outline set to black and Width at 5.0
A black outline appears around the letters Drop Shadow adds a shadow too
The text was easy to read
Before the outline, white text blends into a bright sky. The letters look faint. That is why the text is hard to read over a bright area. With Outline set to black and Width at 5.0, a black outline appears around the letters. Drop Shadow adds a shadow too. In our recording, the text was easy to read.
Don’t make the outline too thick, though. Past a certain point, the outline stands out more than the letters. Stop raising Width once the text is readable. Apple’s guide (Adjust titles) says Outline “Sets the type of color fill, the fill color, opacity, blur, and width.” Apple’s guide does not mention that the outline starts out red.
Make more titles with the same look: hold Option and drag
- Hold Option and drag the title in the timeline to where you want the next text. A copy with the same look appears.
- Move the playhead over the new title, then double-click the text in the viewer.
- Press Command-A to select all the text, then type the new words. Press Escape when you finish.
- To change how long the title stays on screen, drag the edge of the title in the timeline.
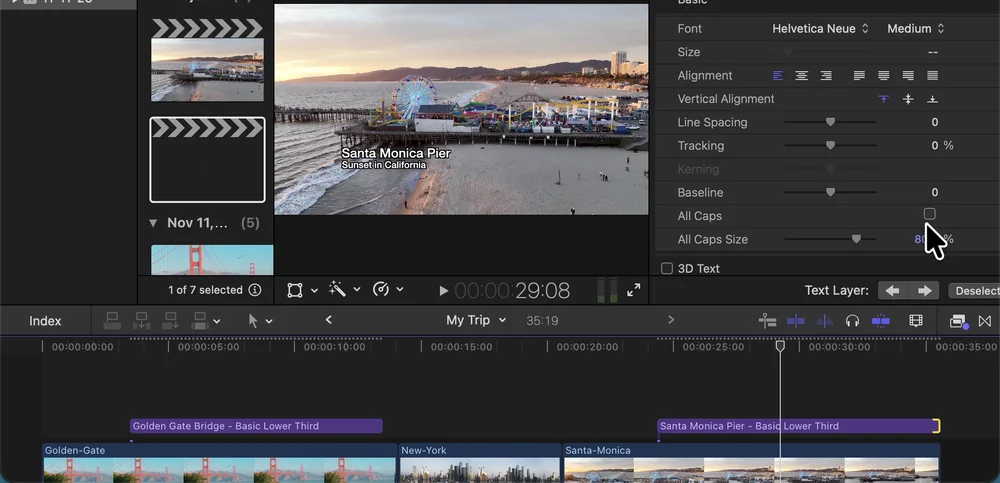
In our English recording, we held Option and dragged the Golden Gate Bridge title to the right, over the Santa Monica clip. We then typed Santa Monica Pier and Sunset in California. The copy kept the black outline and the shadow. In our Japanese recording, where we had changed the font and size before copying, the copy also kept the font and the size of the top line.
When you put the pointer on the right edge of a title, it changes to the trim pointer. Drag the right edge to the right, and the title gets longer. In our Japanese recording, the title went from 10 seconds and 1 frame to 12 seconds and 9 frames, and while we dragged, the timeline showed 12:09 +02:08 (the new length and how much was added).
Add a title that moves: skim the titles in Lower Thirds
To make text animate onto the screen, choose another title in Lower Thirds. Put the pointer on a title in the browser (where the Titles and Generators thumbnails are listed) and move it left and right to preview its animation in the viewer. Drag the one you like above your video. You change its look the same way as Basic Lower Third.
In our English recording, Lower Thirds held more than 30 titles (about 72 by our count on screen). When we moved the pointer left and right over Clouds, the viewer previewed its animation, and we dragged Clouds above the New York clip.
Titles vs. captions: viewers can turn captions on and off
A title is part of the exported video and is always on screen. Text that viewers can usually turn on and off, on players that support it, is a closed caption in Final Cut Pro, and it is separate from titles. Apple’s guide (Intro to captions) says: “Typically, viewers can turn closed captions on or off while watching TV shows, movies, web videos, and other programs. In contrast, titles are always permanently “burned in” to the output media file.”
Final Cut Pro also has Generate Captions, which makes subtitles from speech. According to Apple’s guide (Generate subtitles automatically), it needs a Mac with a chip made by Apple (such as M1 or M4) and works only with U.S. English.
Generate Captions has two choices: Subtitles and Closed Captions. Apple’s guide (Generate subtitles automatically) says: “Automatically generated subtitles are standard title clips created using the default Subtitle title”. So subtitles are burned into the video, like the titles in this article. According to Apple’s guide (Create closed captions), choosing Closed Captions instead makes closed captions that viewers can turn on and off. Both work only with U.S. English. We did not try Generate Captions for this article.
Final Cut Pro text at a glance
| What you want | What to do | What happens |
|---|---|---|
| Add a title | Move the playhead and press Control-Shift-T (if the default has not been changed) | A Basic Lower Third appears above the video |
| Pick one from the list | Titles and Generators, Lower Thirds, then drag above the video | The title you chose is added |
| Change the words | Double-click the text in the viewer (Command-A for longer text) | The text is replaced |
| Move the whole title | Transform at the bottom left of the viewer, drag inside the frame, then Done | Both lines move together |
| Font and size | Select the line in the viewer, press Command-4, click Text, then Font and Size under Basic | The letters change shape and size |
| Make it readable | Select Outline, set Color to black, raise Width | A black outline appears around the letters |
| Add a shadow | Select Drop Shadow | A shadow appears under the text |
| Make another with the same look | Hold Option and drag the title | A copy with the same outline and shadow |
| Change how long it shows | Drag the edge of the title in the timeline | The title gets longer or shorter |
Frequently asked questions
Can Final Cut Pro make subtitles automatically?
Generate Captions makes subtitles from speech, but only in U.S. English and only on a Mac with a chip made by Apple (such as M1 or M4). For other languages, you type the text yourself. Apple’s guide (Import closed captions) says you can bring in an SRT caption file with File > Import > Closed Captions. We did not try this.
How do I change the color of the text?
Apple’s guide (Adjust titles) says to click the color well in the Face section of the inspector and choose a color. The color of the outline is set with Color under Outline. In our recording, we left the text white and changed only the outline to black.
Only one line moves when I drag the title. Why?
Dragging the text in the viewer moves only the line you clicked. To move the whole title, click Transform at the bottom left of the viewer first, then drag inside the frame. Click Done when you finish.
I added an outline, but the text is still hard to read.
Raise Width under Outline a little more. If it is still hard to read, select Drop Shadow as well. Just don’t make the outline so thick that it stands out more than the letters.
If you want an easier way: check caption size on iPad with Proofcut
The surest way to know whether your text is big enough for a phone is to watch the exported video on an iPhone. We (Wada Digital Lab) make and sell Proofcut (formerly QMark), a video review app. On iPad, you can see how big the captions will look on an iPhone, at real size. You can also pause the video and mark the hard-to-read spots with a red pen.
Proofcut runs on iPad with iPadOS 26.0 or later and on iPhone with iOS 26.0 or later. It does not work on earlier versions. Opening videos and marking them up is free; exporting and sharing are in-app purchases.
What we tested, and sources
- Recording Mac: MacBook Air (M2), macOS Golden Gate 27.2, Final Cut Pro 12.4, with English (US) menus. We used a recording user account and a project named My Trip. The clips were three videos from a stock video site with no rights issues (the Golden Gate Bridge, a New York street, and the Santa Monica Pier) and a CC0 music recording. We recorded on November 11 and 12, 2026.
- What we saw in the English recording: adding a Basic Lower Third with Control-Shift-T. Dragging Basic Lower Third from Lower Thirds in Titles and Generators. Typing new text by double-clicking in the viewer, and moving the whole title with Transform and Done. Opening the inspector with Command-4, choosing Avenir Next Bold in Font, and raising the Size of the top line from 66 to 104. Selecting both lines, setting Outline to black with a Width of 5.0, and adding Drop Shadow. Making a copy by holding Option and dragging, typing new text with Command-A, and dragging its edge to make it longer. Skimming the titles in Lower Thirds.
- What we saw only in the Japanese recording (same Mac, Japanese menus): that dragging without Transform moves only one line, that typing a Size with the whole title selected made both lines overlap, and the length shown while dragging the edge of a title.
- The screenshots in this article come from the English recordings we made for our YouTube video.
What we have not tried on screen: Generate Captions, creating or importing closed captions, changing the Face color, and watching the exported video on an iPhone. For these, we followed Apple’s guides.
Apple’s guides:
- Intro to titles in Final Cut Pro for Mac
- Add titles in Final Cut Pro for Mac
- Adjust titles in Final Cut Pro for Mac
- Text inspector controls in Final Cut Pro for Mac
- Intro to captions in Final Cut Pro for Mac
- Generate subtitles automatically in Final Cut Pro for Mac
- Create closed captions in Final Cut Pro for Mac
- Add the default title in Final Cut Pro for Mac
- Import closed captions into Final Cut Pro for Mac
For the difference between libraries, events, and projects, and for import settings, see Final Cut Pro Library vs. Event vs. Project.
Mac, macOS, Final Cut Pro, iMovie, and iPhone are trademarks of Apple Inc. Wada Digital Lab is not affiliated with these companies.