Final Cut Pro Library vs. Event vs. Project — How to Get Started and Import Your First Videos with Copy to Library
Published November 12, 2026
Steps checked November 11, 2026 (MacBook Air (M2), macOS Golden Gate 27.2)
By Wada Digital Lab
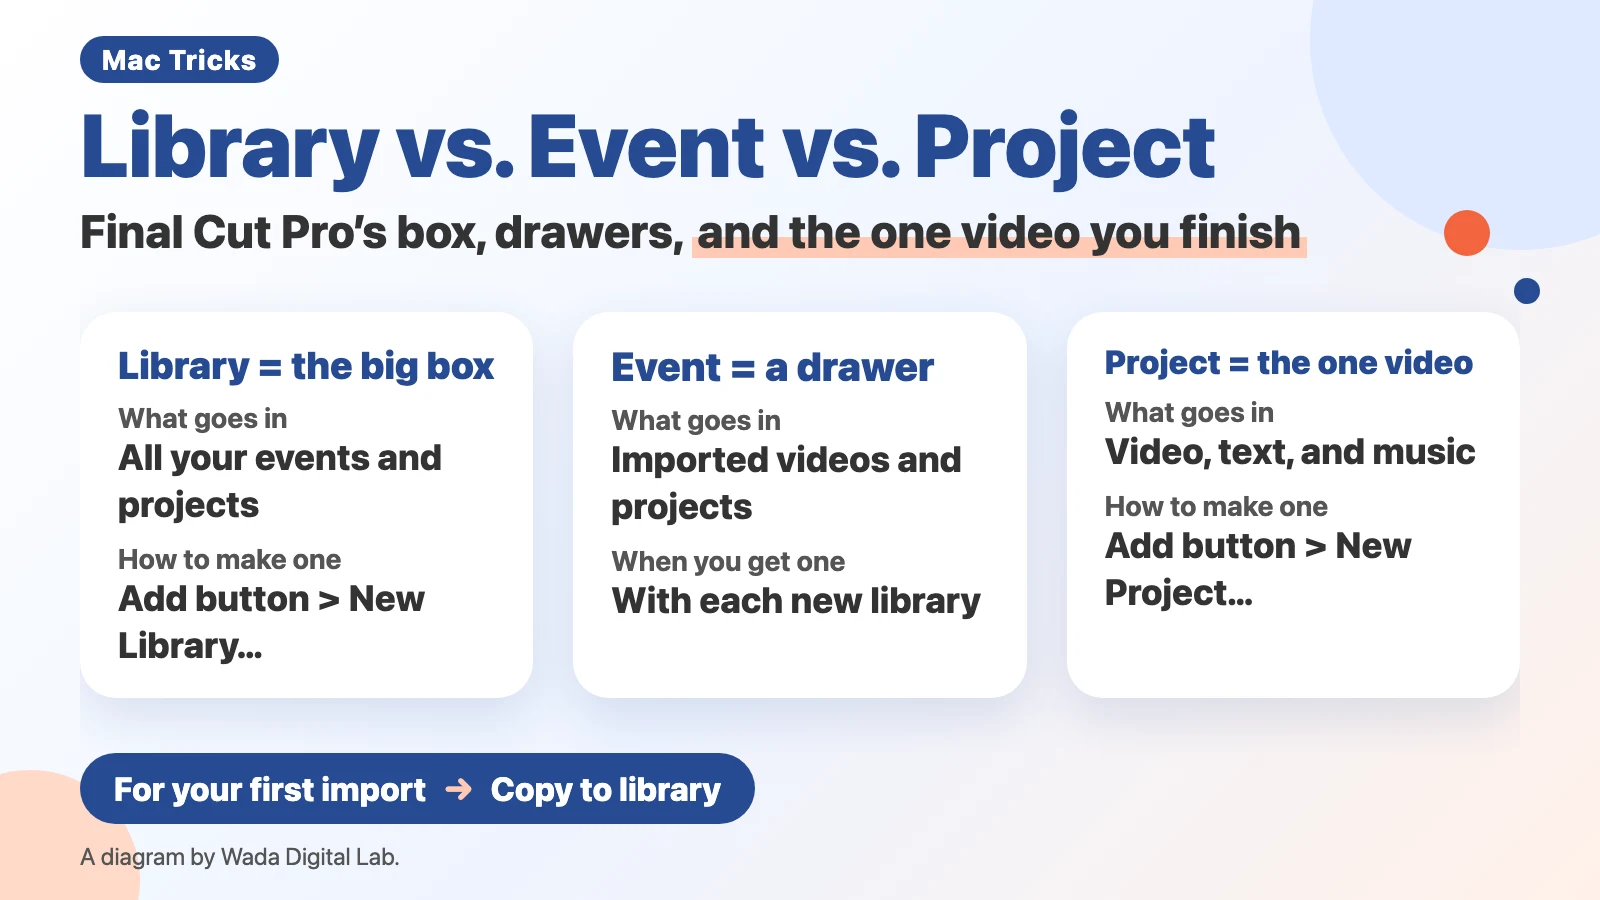
In Final Cut Pro, a library is the big box that keeps track of your video material and your edits. An event is a drawer inside that box, where your imported videos go. A project is the one video you edit and finish, and it goes in an event, too. To get started, click the Add button (+) in the toolbar and choose New Library…. Final Cut Pro then creates one event named with the date. For your first import, choose Copy to library in the Media Import window, so a copy of each video goes into your library. We checked these steps on the Mac we used for our recordings (macOS 27.2, Final Cut Pro 12.4, English menus).
Key points
- Library vs. event vs. project: a library is the big box, an event is a drawer inside it, and a project is the one video you finish. Both your imported videos and your projects go in an event.
- Getting started: click the Add button (+) in the toolbar, choose New Library…, type a name, and click Save. In our recording, the Libraries sidebar then showed the new library with an event named 11-11-26 (the date).
- The four areas of the screen: the browser at the top left lists your videos, the viewer to its right plays them, the inspector on the far right holds detailed settings, and the timeline at the bottom is where you arrange and edit.
- Your first import: in the Media Import window, select Copy to library under Files, then click Import All. With Leave files in place, the library only links to the original videos where they are.
- Coming from iMovie: in iMovie, choose File > Send Movie to Final Cut Pro to send a movie. After you send it, check in Final Cut Pro that all your videos are there.
The diagram below shows how libraries, events, and projects fit together.
This article was written by Wada Digital Lab, which is not affiliated with Apple. It is not a paid promotion.
Final Cut Pro library vs. event vs. project: a box, its drawers, and the one video you finish
A library in Final Cut Pro is the container that keeps track of the videos you import and the edits you make. On the Mac we used for our recording, the window with no library showed Create Library with the words “Libraries hold all of your media, events, and projects.” Apple’s guide (“What are libraries in Final Cut Pro for Mac?”) puts it this way: “In Final Cut Pro, you organize your work in libraries.”
An event is the place inside a library where you sort your videos. Apple’s guide (“Final Cut Pro for Mac interface”) says: “An event is like a folder that contains clips and projects.” A clip is each video you imported. If you make one event per trip or per job, your videos are easier to find later.
A project is the one video you edit and finish. When an event had no project yet, the timeline in our recording showed Create Project with the words “A project is a timeline where you can arrange and edit your media.” Projects go in events, too.
So the big box (the library) has drawers (events), and each drawer holds your imported videos and the videos you are finishing (projects). When you are starting out, one library is enough.
Final Cut Pro vs. iMovie: send an iMovie movie with Send Movie to Final Cut Pro
Final Cut Pro is Apple’s video editing app for the Mac. Apple also makes iMovie, another video editing app for the Mac.
At Wada Digital Lab, we used to make our videos in iMovie. When we added text to a video, we often could not place it, size it, or color it the way we wanted. iMovie is not built for that kind of detailed work.
In Final Cut Pro, you set those details in the inspector on the far right. For example, the Size slider sets how big the text is. Apple’s guide (“Text inspector controls in Final Cut Pro for Mac”) says: “The slider is constrained to a maximum of 288 points.” Points are a unit for text size. (We did not try adding text in this article.)
You can send a movie you started in iMovie to Final Cut Pro. In iMovie, choose File > Send Movie to Final Cut Pro (we found this command in the File menu of iMovie 10.4.5 in our English recording). Apple’s guide (“Import into Final Cut Pro for Mac from iMovie for macOS”) explains: “The project file and the media used in the project are copied to your Final Cut Pro library.”
After you send it, check the browser in Final Cut Pro to make sure your videos and your movie are all there. Until you have checked, don’t delete your iMovie library or your original videos.
Final Cut Pro and Apple Creator Studio: two apps in the App Store, so check your Mac first
When you search for Final Cut Pro in the App Store, two apps show up. In our English recording, the results listed Final Cut Pro (Professional post-production), the one you buy once, and an app whose name began with “Final Cut Pro: Create Vid…” (the full name in the App Store is Final Cut Pro: Create Video). Apple Creator Studio appeared in the same results.
Apple Creator Studio is Apple’s paid plan that bundles its video, music, and image apps. Apple’s guide (“What is Apple Creator Studio?”) says: “Final Cut Pro for Mac is part of Apple Creator Studio.” The same page lists Logic Pro, Pixelmator Pro, Motion, Compressor, and MainStage as the other apps included. To see what you are paying for, choose Final Cut Pro > Manage Subscriptions…. In our English recording, this opened the App Store, and Apple Creator Studio was in the Subscriptions list.
Also check that your Mac can run Final Cut Pro before you get it. Apple’s Final Cut Pro specs page says: “Final Cut Pro for Mac requires macOS 15.6 or later, 8GB of memory (16GB recommended)”. However, when we checked Final Cut Pro 12.4 (the one that comes with Apple Creator Studio, the same version we recorded with) on another Mac of ours, the app’s own minimum macOS setting was 26.6. When we looked up both Final Cut Pro apps in Apple’s App Store search data on November 12, 2026, each listed 26.6 as the minimum macOS version, too. The specs page and the apps don’t match, so before you get it, check the Compatibility section on the App Store page to see whether it works with the macOS on your Mac.
Create your first library: Add button > New Library…, and you get a dated event too
After you open Final Cut Pro, the first thing to do is create a library.
- Click the Add button (+) on the left side of the toolbar, then choose New Library…. (You can also choose File > New > Library from the menu bar.)
- In Save As, type a name for the library (we used My First Library).
- Check Where (Movies in our recording), then click Save.
The screenshot below shows the window right after we clicked Save.
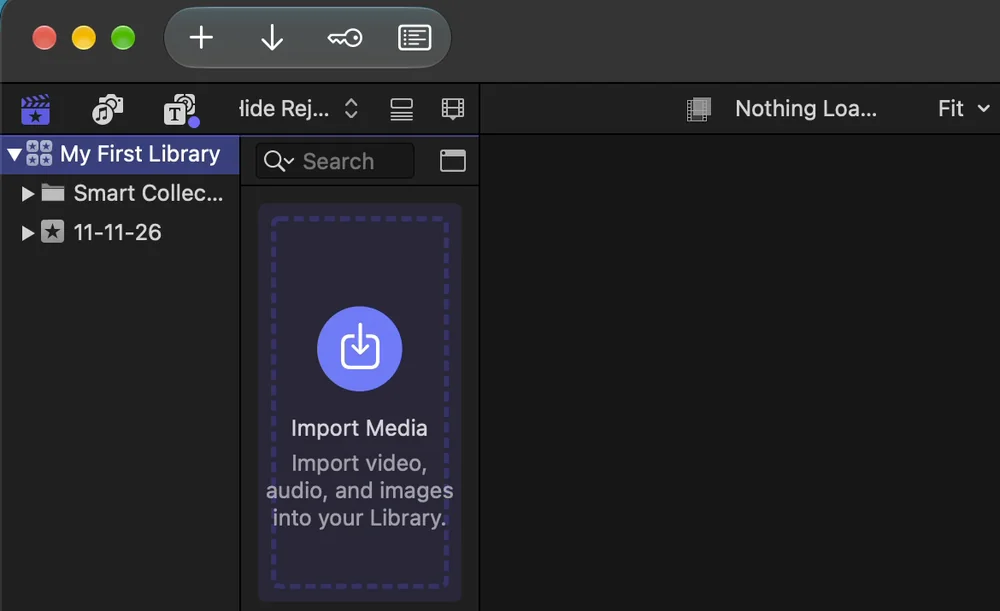
In our recording, after we clicked Save, My First Library appeared in the Libraries sidebar with an event named 11-11-26 inside it. When we held the pointer over the event, it showed November 11, 2026, so the name is the date written as month-day-year. Apple’s guide (“If it’s your first import into Final Cut Pro for Mac”) says the same: “Final Cut Pro adds the new library to the Libraries sidebar and creates an event within it named with the date.”
Apple’s guide “What are libraries in Final Cut Pro for Mac?” also says: “The first time you open Final Cut Pro, it creates a library file in the Movies folder.” But when we opened Final Cut Pro for the first time on our recording Mac, no library was made for us. First, What’s New in Final Cut Pro appeared, and we clicked Continue. Next came a window about notifications (Stay Up To Date With Notifications), and then Downloading Content Library, which said: “Final Cut Pro is downloading the content library for faster access during editing.” The download was 597.9 MB, and it offered Download Later and OK. After we clicked OK, the window had no library and showed the Create Library button. If you don’t see a library, just create one yourself. Apple’s guide (“If it’s your first import into Final Cut Pro for Mac”) gives this step: “In the Final Cut Pro main window, click Create Library.”
Add more events and projects: New Event… and New Project…
To add a drawer (an event), select the library in the Libraries sidebar, then click the Add button (+) and choose New Event…. In our recording, this menu listed New Project…, New Event…, and New Library…. Apple’s guide (“Create a new event in Final Cut Pro for Mac”) describes the menu bar way: “Choose File > New > Event (or press Option-N).”
Create the video you will finish (a project) after you import your videos, with the same Add button (+) > New Project…. For the steps from creating a project to cutting and exporting, see How to Use Final Cut Pro for Beginners — Cut Your iPhone Videos, Add Text and Music, and Export to MP4.
The four areas of the screen: browser, viewer, inspector, and timeline
The Final Cut Pro window is divided into four main areas. On the far left is the Libraries sidebar, where your libraries and events are listed. The screenshot below shows the whole window with all four areas.
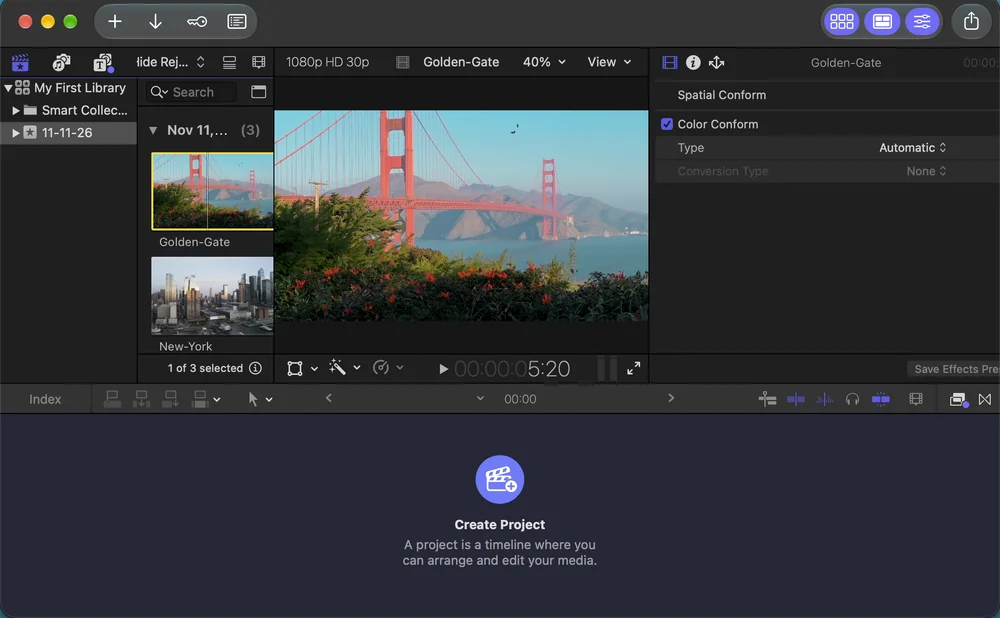
- Browser (top left): the videos you imported into an event appear here. This is where you choose a video.
- Viewer (top middle): this is where you play and watch your videos.
- Inspector (far right): this is where you fine-tune settings for the video or text you selected.
- Timeline (bottom): this is where you arrange your videos and cut and join them.
In our recording, when we selected the clip Golden-Gate in the browser, it appeared in the viewer, and the inspector showed settings such as Spatial Conform and Color Conform. We had not created a project yet, so the timeline said Create Project.
Import your first videos: choose Copy to library if you are new
Before you import, put your iPhone videos in a folder on your Mac. (Sending them with AirDrop is covered in How to Use Final Cut Pro for Beginners.)
- In the Libraries sidebar, select the event you want to add the videos to.
- Click the Import button (the down arrow) in the toolbar. You can also choose File > Import > Media.
- In the Media Import window, open the folder that has your videos.
- On the right, under Add to existing event, choose the event.
- Under Files, select Copy to library.
- Click Import All at the bottom right.
In our recording, holding the pointer over the Import button showed “Import media from a device, camera, or archive” with the shortcut Command-I, and clicking the button opened the Media Import window. The screenshot below shows the settings on the right side of that window.
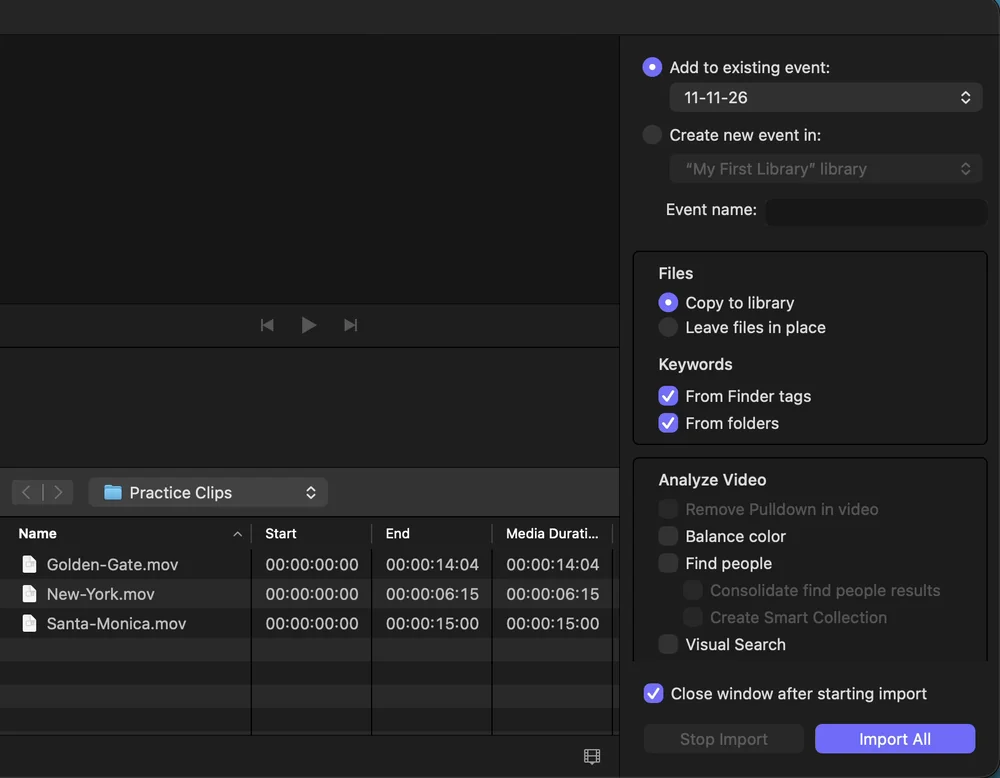
In our recording, after we selected Copy to library and clicked Import All, the window closed and the three videos (Golden-Gate, New-York, and Santa-Monica) appeared in the browser.
Copy to library vs. Leave files in place
Apple’s guide (“Organize files during import into Final Cut Pro for Mac”) explains the two options like this:
- Copy to library: “This option duplicates the media files and places the copies in the current library storage location.”
- Leave files in place: “This option links to the source media files at their current location.”
With Copy to library, a copy of each video goes into your library. Even if you delete the original video, you can still use it in your edit. The trade-off is that your Mac has less free space. With Leave files in place, the library only gets a link to where each original video is. If you delete the original video, you can no longer use it in your edit. The upside is that you don’t use extra space on a second copy of each original video. (One exception: if you also created proxy media, Final Cut Pro keeps those smaller copies, and Apple’s guide calls them “useful for offline editing.” We did not try this.) The diagram below compares the two.
Copy to library
A copy of each video goes into your library You can still use it in your edit after you delete the original
Your Mac has less free space
Leave files in place
The library only gets a link to where each original video is If you delete the original video, you can no longer use it in your edit
You don’t use extra space on a second copy of each original video
The same is true if your videos are on an external drive and you disconnect it: videos imported with Leave files in place can no longer be used in your edit. If you are new and your library is on your Mac (in our recording, it was in the Movies folder), choosing Copy to library means you don’t have to worry about this.
Whichever option you choose, the Transcode settings in the same window also use space. Create optimized media makes a copy of each video in a format that is smoother to edit, and Create proxy media makes smaller copies for editing on a less powerful Mac (Apple’s guide “Import settings in Final Cut Pro for Mac”). If you select either option, the files Final Cut Pro makes take up room on your Mac. Apple’s guide (“Organize files during import into Final Cut Pro for Mac”) says that in that case, “the files are transcoded and optimized after the import is complete.”
Still, copying does take space on your Mac. Apple’s guide (“What are libraries in Final Cut Pro for Mac?”) notes that “media files—especially video files—tend to be quite large.” If your Mac is low on space, choose Leave files in place, and don’t move or delete the original video files.
One more thing: importing keeps going in the background. Apple’s guide (“Organize files during import into Final Cut Pro for Mac”) says: “Your media is imported in the background.” Importing continues for a while after you click Import All, so don’t delete the original videos until it has finished.
Library, event, and project at a glance
| Name | Think of it as | What goes in | How to make one |
|---|---|---|---|
| Library | The big box | All your events and projects | Add button (+) > New Library… |
| Event | A drawer inside the box | Imported videos and projects | You get one named with the date when you create a library. To add more, Add button (+) > New Event… |
| Project | The one video you finish | The video, text, and music you arrange in the timeline | Add button (+) > New Project… |
Frequently asked questions
Where is my Final Cut Pro library saved?
In the folder you chose under Where when you created it. On our recording Mac, Where was set to Movies from the start. Apple’s guide (“Create a new library in Final Cut Pro for Mac”) also notes: “You can’t store your Final Cut Pro library on a storage device that’s used for Time Machine backups.”
Should I make a new library for each video?
When you are starting out, one library is enough. Put your videos in separate events, one per trip or per job. Apple’s guide (“What are libraries in Final Cut Pro for Mac?”) says: “A library can contain multiple events and projects in the same location.”
Why is my Final Cut Pro library so big?
With Copy to library, the library holds a copy of every video you import, so it grows with your videos. Final Cut Pro also makes extra files on its own. Apple’s guide (“What are libraries in Final Cut Pro for Mac?”) says: “Render files, optimized files, proxy files, and analysis files are all considered generated media because the system creates them in the background after the original media has been imported.” The same guide says: “To reduce a library’s size, and to move, copy, or archive a library more quickly, you can delete all the generated media (proxy, optimized, or render files) in one step.” (We have not tried this.)
Where is my project?
It is in the event you had selected when you created it. Select that event in the Libraries sidebar, and the project appears in the browser along with your videos.
I imported my videos, but they don’t appear.
Select the event you imported them into again in the Libraries sidebar. Your videos are in the event you chose under Add to existing event in the Media Import window.
What we tested, and sources
- Recording Mac: MacBook Air (M2), macOS Golden Gate 27.2, Final Cut Pro 12.4, iMovie 10.4.5, with English (US) menus. We used a recording user account with a new library (My First Library). We imported three videos from a stock video site with no rights issues (the Golden Gate Bridge, a New York street, and the Santa Monica Pier). We recorded on November 10 and 11, 2026.
- What we saw in the English recording: two Final Cut Pro apps in the App Store search results. Opening Final Cut Pro for the first time, the windows that came before Create Library, and the Create Library button. Creating a library with the Add button (+) > New Library… and getting a dated event. The New Event… item in the same menu. The browser, viewer, inspector, and timeline. Clicking Import All with Copy to library and seeing the videos in the browser. Send Movie to Final Cut Pro in the iMovie File menu. Manage Subscriptions… in the Final Cut Pro menu opening the Subscriptions list in the App Store.
- The minimum macOS version: we read the setting inside Final Cut Pro 12.4 on another Mac of ours, and we looked up both apps in Apple’s App Store search data on November 12, 2026.
- The screenshots in this article come from recordings we made for our YouTube video. In two of them, we painted over the pointer with the background color of that part of the window.
What we have not tried on screen: creating an event with New Event…, importing with Leave files in place, keeping a library on an external drive, changing text size in the inspector, deleting generated media to make a library smaller, and editing with proxy media after the original video is gone. For these, we followed Apple’s guides.
Apple’s guides and pages:
- What are libraries in Final Cut Pro for Mac?
- Final Cut Pro for Mac interface
- If it’s your first import into Final Cut Pro for Mac
- Create a new library in Final Cut Pro for Mac
- Create a new event in Final Cut Pro for Mac
- Organize files during import into Final Cut Pro for Mac
- Import settings in Final Cut Pro for Mac
- Import into Final Cut Pro for Mac from iMovie for macOS
- Text inspector controls in Final Cut Pro for Mac
- What is Apple Creator Studio?
- Final Cut Pro specs
Mac, macOS, Final Cut Pro, iMovie, iPhone, AirDrop, App Store, Logic Pro, Pixelmator Pro, Motion, Compressor, MainStage, and Time Machine are trademarks of Apple Inc. YouTube is a trademark of Google LLC. Wada Digital Lab is not affiliated with these companies.